> ## Documentation Index
> Fetch the complete documentation index at: https://docs.heygarth.ai/llms.txt
> Use this file to discover all available pages before exploring further.
# SSO with Google
> Create the Google Cloud OAuth client for G360 and collect its credentials.
This page covers **Step 4** (creating the application) for Google. Everything else — enabling SSO, entering credentials, access policy — is the same for all providers and is covered in [SSO Setup](/g360/sso-setup).
**Copy the callback URL from G360 first.** Go to **Settings → SSO Settings**, turn on **Enable single sign-on**, and copy the read-only **Callback URL** from the Identity Provider section. You paste it into Google below.
**Google cannot do SCIM provisioning** — for any custom application, on any Google account type or plan. This is a Google platform limitation, not a setup gap. See [SCIM provisioning](#scim-is-not-available-with-google) below.
## Create a project and the consent screen
Console: [Google Cloud Console](https://console.cloud.google.com), signed in with the Google account or Workspace that should own this integration.
Create or select a project, then go to **APIs & Services → OAuth consent screen** (shown as **Google Auth Platform** on newer projects):
| Field | Value |
| ------------------------ | --------------------------------- |
| **App name** | `G360` (or any recognizable name) |
| **User support email** | Your own address |
| **Audience / User type** | **External** |
| **Contact email** | Your own address |
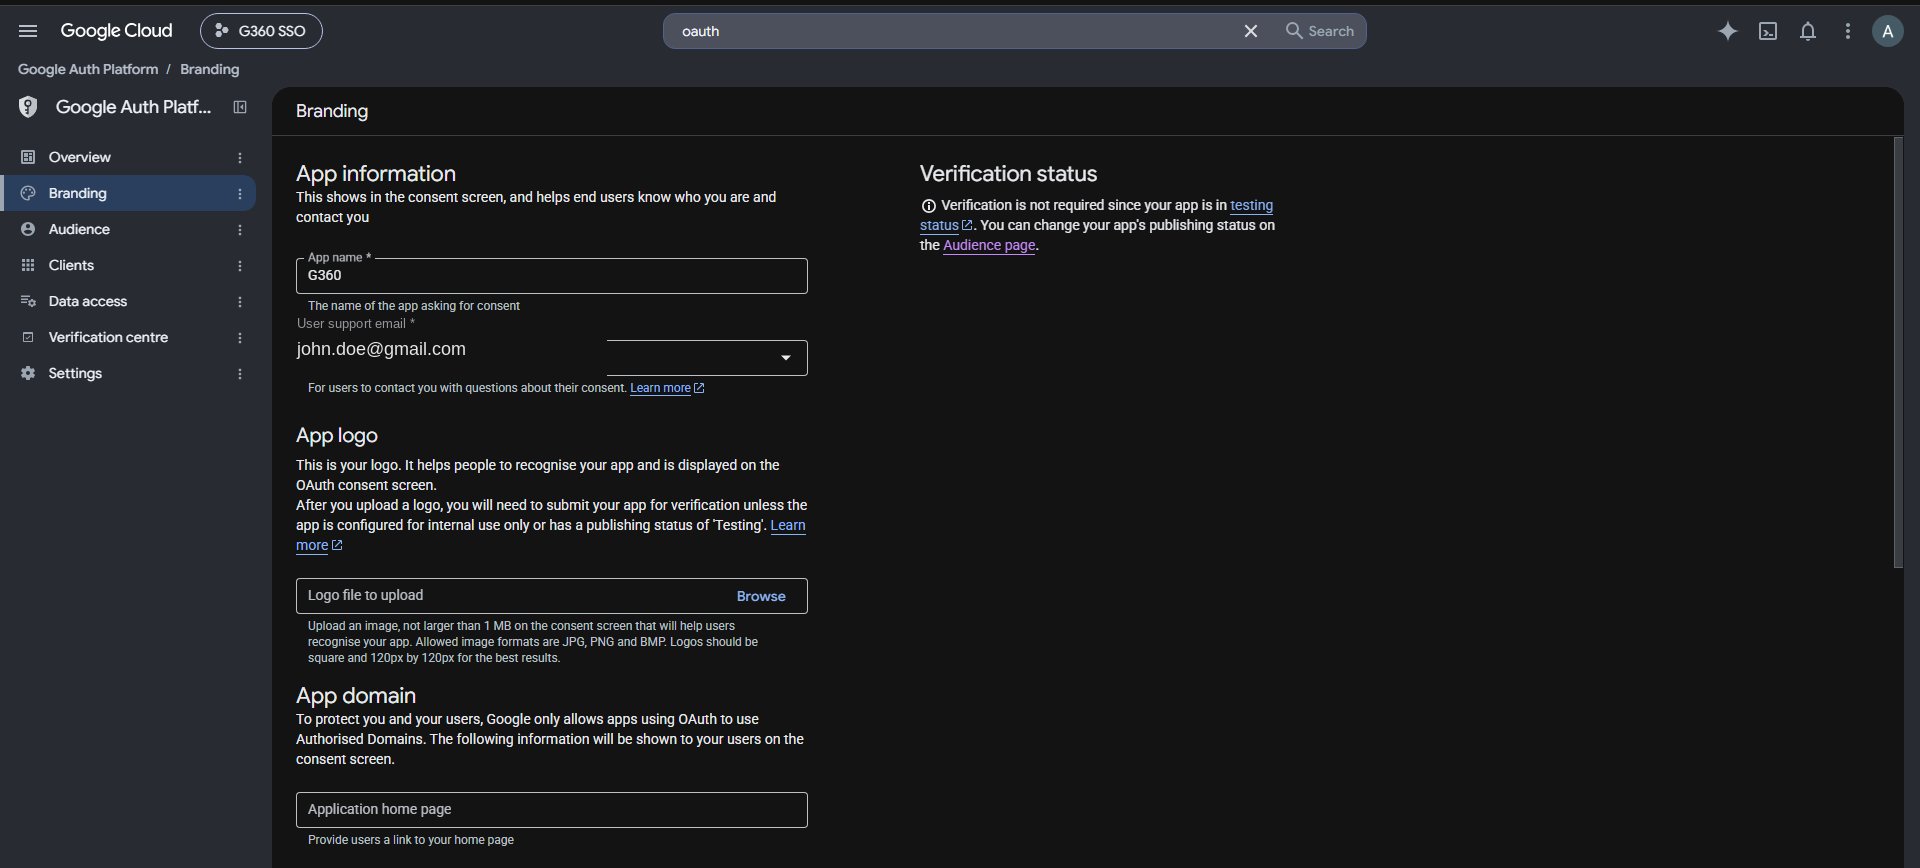 **External is correct here, and is not the same as public.** "Internal" is only offered on a Workspace organization and restricts sign-in to that organization's own accounts. Choosing External does **not** publish the app — it stays in **Testing** status until you explicitly publish it, which the next step relies on. No sensitive scopes are involved, so Google verification is never required.
 ## Add test users
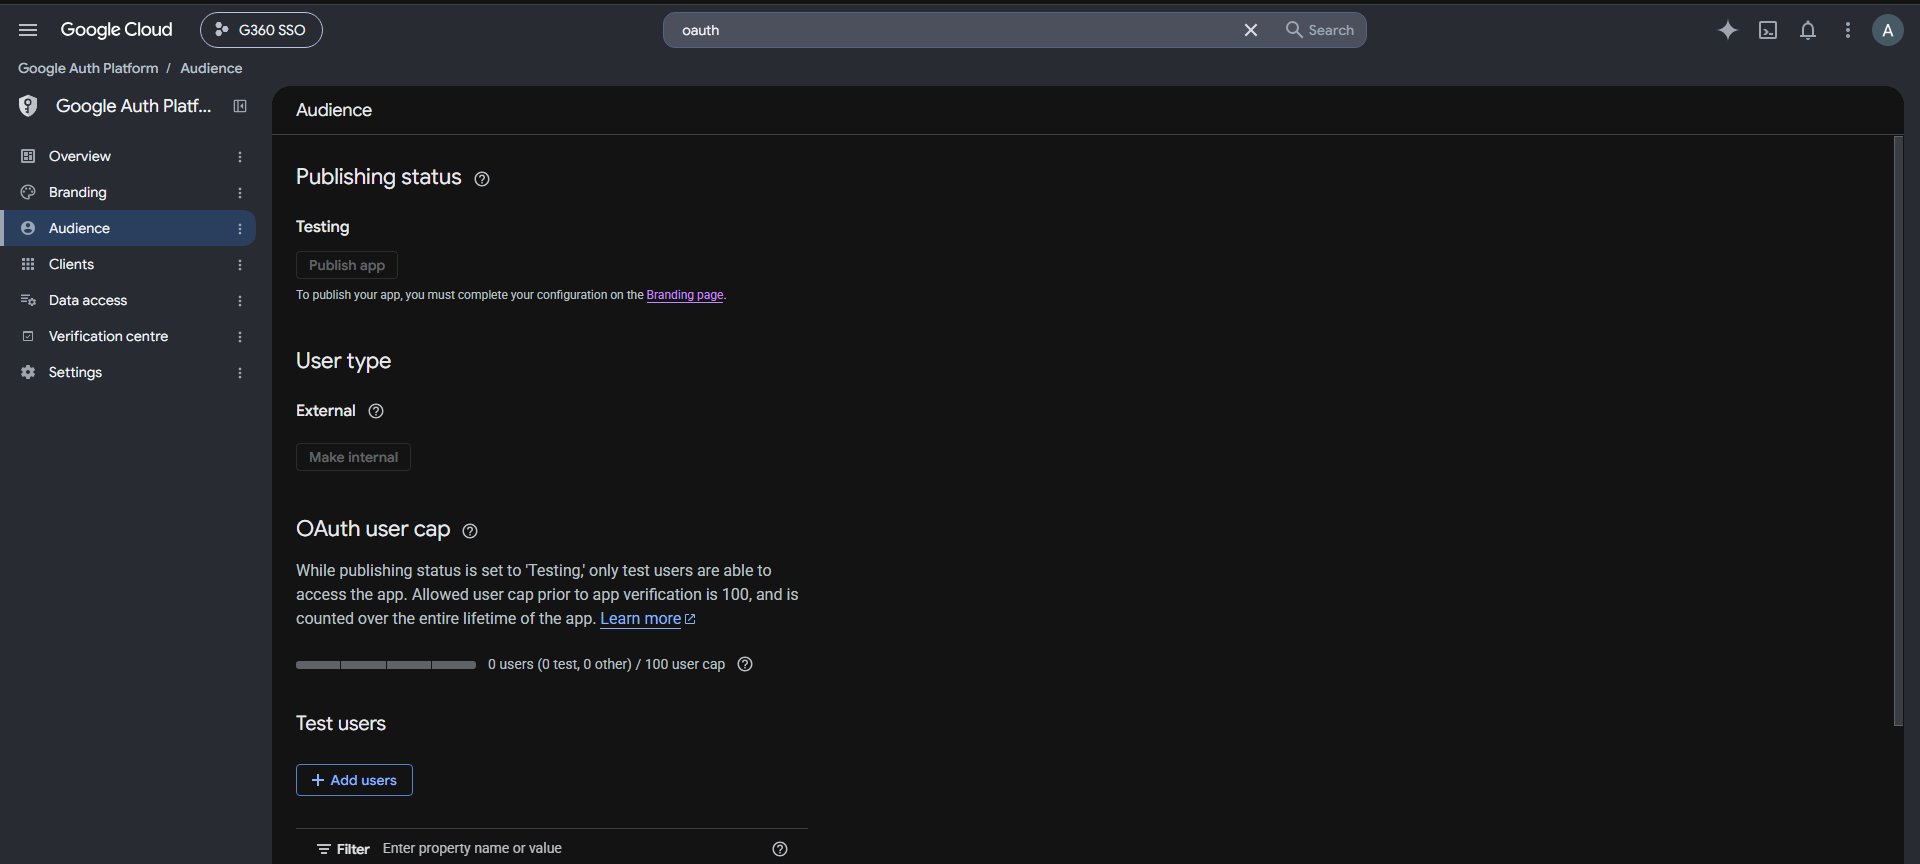
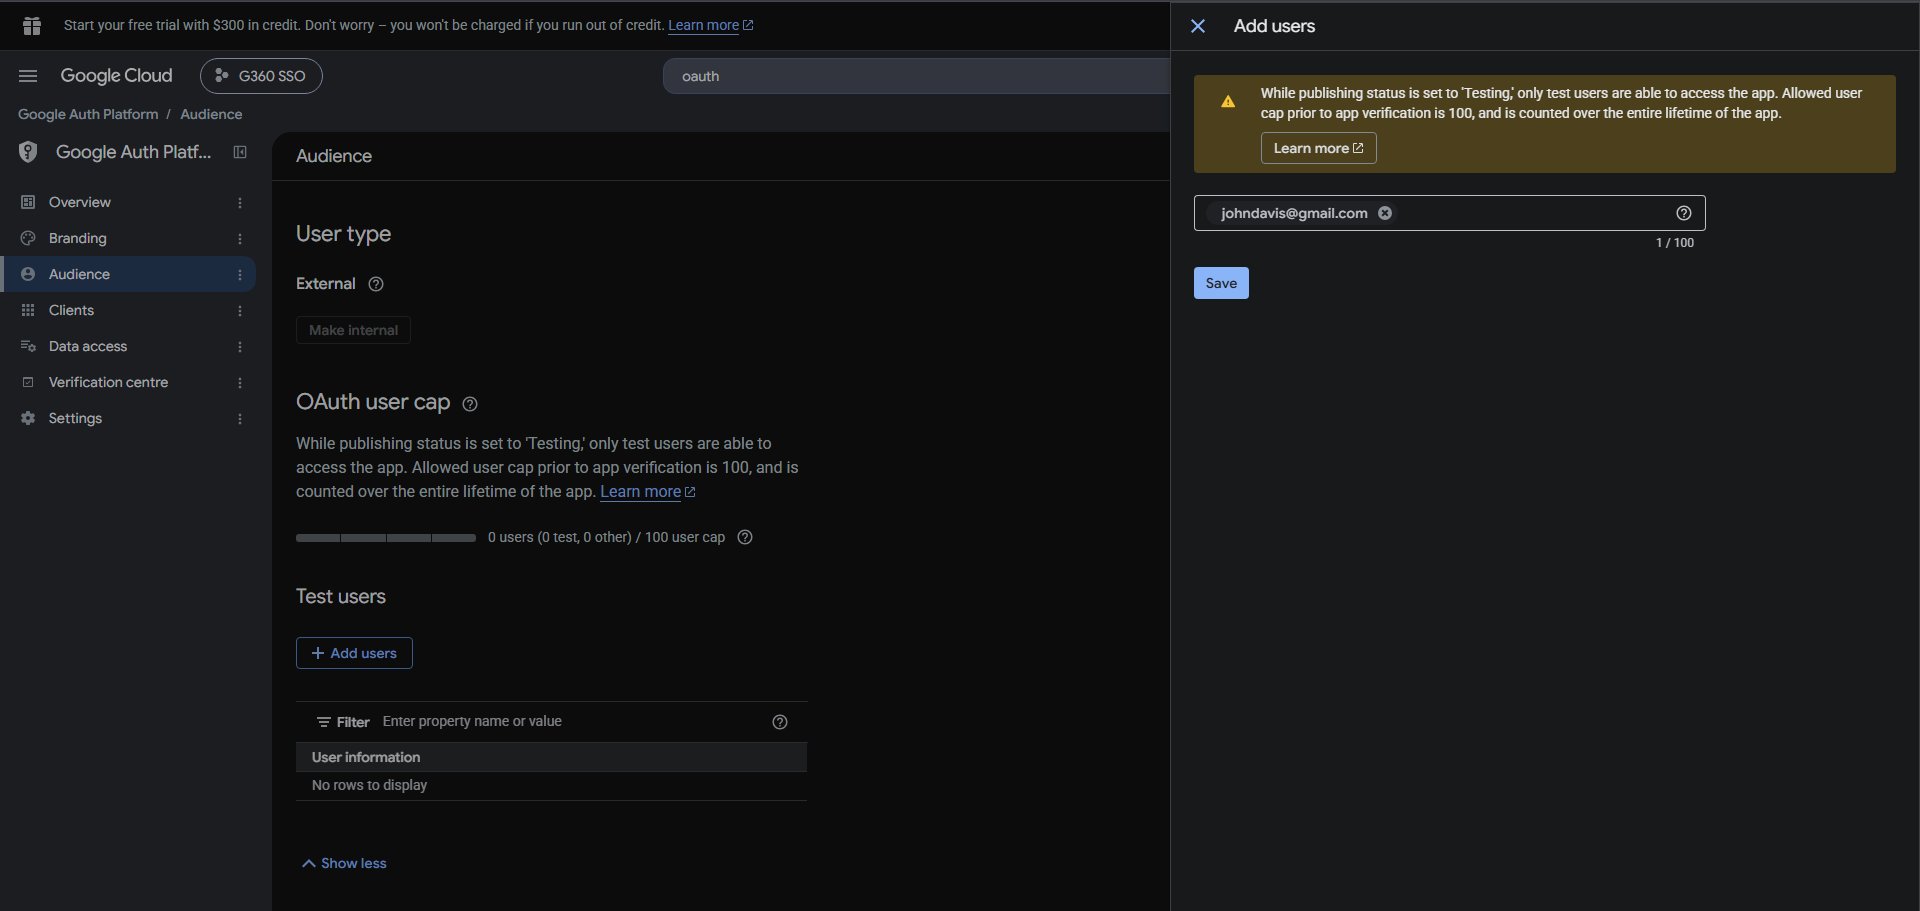
**Google Auth Platform → Audience → Test users → Add users**, and add every account that needs to sign in to G360.
**Skipping this is the most common failure on Google.** While publishing status is **Testing**, the app admits **only** the accounts on this list. Everyone else is refused by Google itself with `403 access_denied` **before G360 is ever contacted** — so there is nothing in G360 to explain it.
Testing status is fine to leave indefinitely for a small, known set of users. Move the app to production if you want anyone on your domain to sign in without being added individually.
## Add test users
**Google Auth Platform → Audience → Test users → Add users**, and add every account that needs to sign in to G360.
**Skipping this is the most common failure on Google.** While publishing status is **Testing**, the app admits **only** the accounts on this list. Everyone else is refused by Google itself with `403 access_denied` **before G360 is ever contacted** — so there is nothing in G360 to explain it.
Testing status is fine to leave indefinitely for a small, known set of users. Move the app to production if you want anyone on your domain to sign in without being added individually.
 ## Create the OAuth client
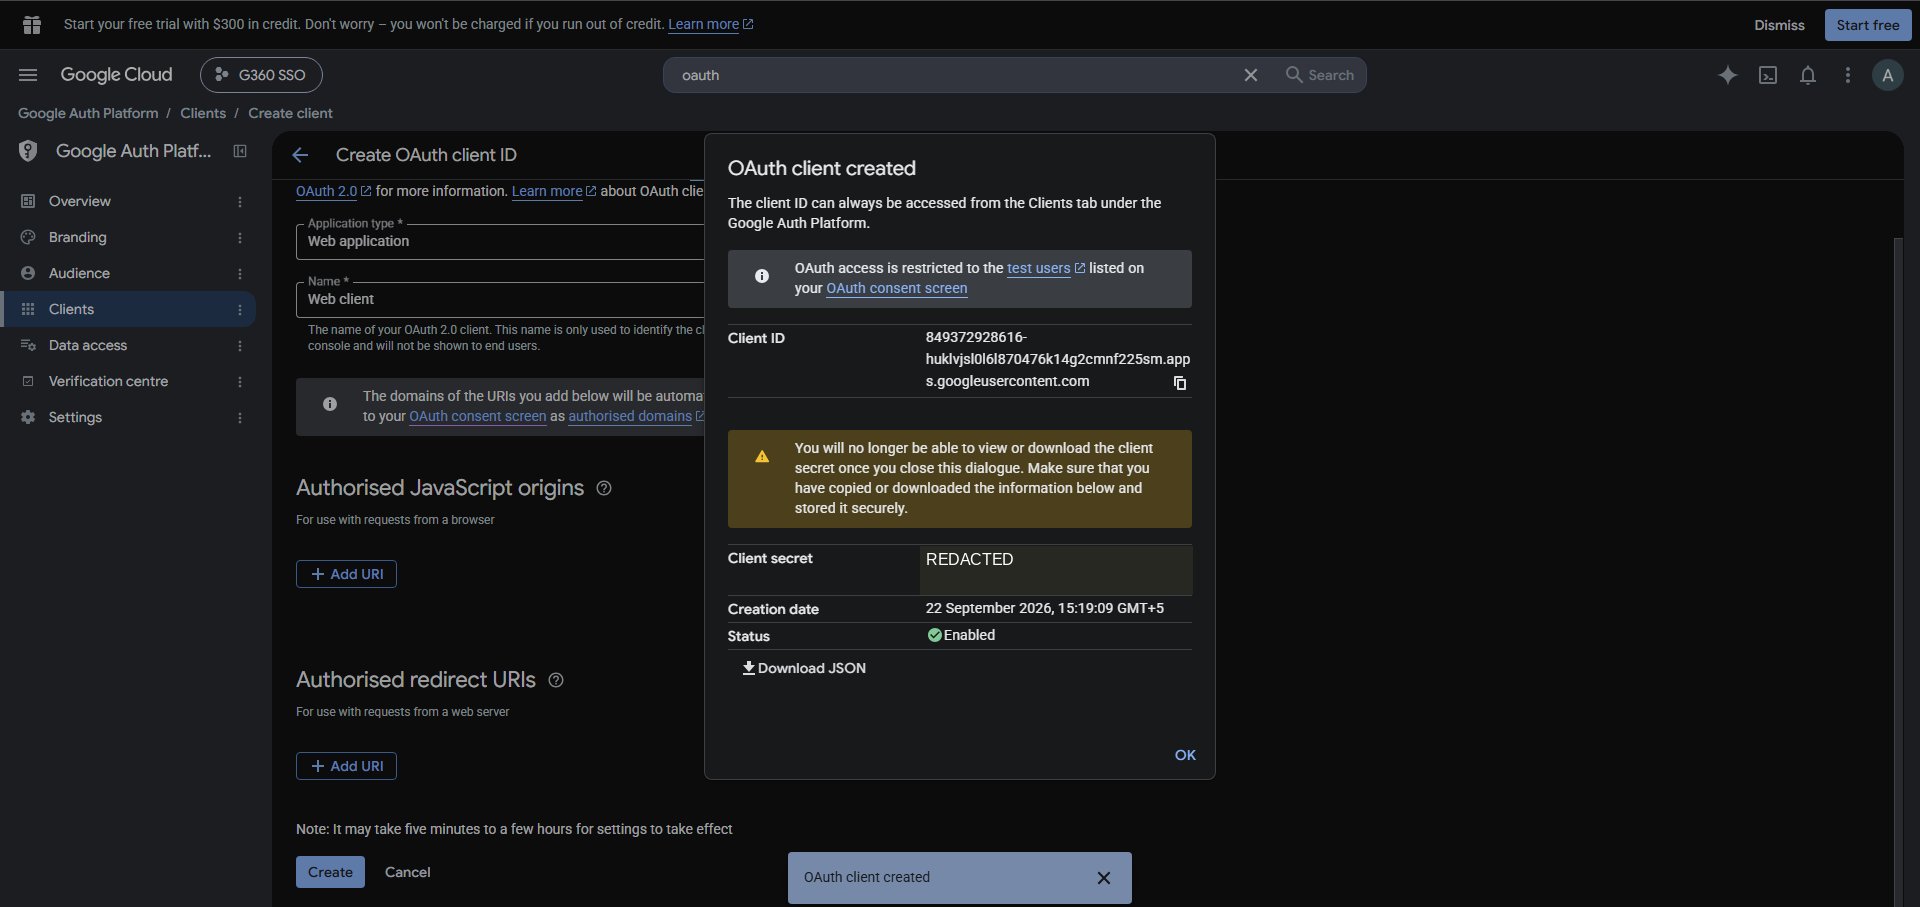
**Google Auth Platform → Clients → Create client.**
| Field | Value |
| --------------------------------- | -------------------------------- |
| **Application type** | **Web application** |
| **Authorized JavaScript origins** | Leave empty |
| **Authorized redirect URIs** | Paste the callback URL from G360 |
Copy the **Client ID** and **Client Secret** from the dialog — the secret is shown once and never again.
## Create the OAuth client
**Google Auth Platform → Clients → Create client.**
| Field | Value |
| --------------------------------- | -------------------------------- |
| **Application type** | **Web application** |
| **Authorized JavaScript origins** | Leave empty |
| **Authorized redirect URIs** | Paste the callback URL from G360 |
Copy the **Client ID** and **Client Secret** from the dialog — the secret is shown once and never again.
 ## Issuer URL
Fixed for every Google account, with nothing to look up:
```text Issuer URL theme={null}
https://accounts.google.com/.well-known/openid-configuration
```
## Next: enter the details in G360
You now have the **Client ID**, **Client Secret** and **Issuer URL**. Return to [Step 5 of the setup guide](/g360/sso-setup#step-5-enter-the-details-in-g360) to enter them, test the connection, and save.
***
## SCIM is not available with Google
Google cannot drive SCIM provisioning to any custom application, including G360, on any Google account type or plan. **There is no configuration change, on either side, that enables it** — Google's automated provisioning is limited to catalog applications with pre-built connectors.
What to do instead:
* Set **New-user provisioning** to **Create automatically on first sign-in** in the [Access Policy](/g360/sso-setup#access-policy), so accounts are created when people first sign in.
* Handle removals directly in G360 under **Administration → User & Team Management**.
***
## Provider-specific errors
If Google's own screen shows an error before you're redirected back to G360, the problem is on its side.
| Message | Meaning |
| ----------------------- | ------------------------------------------------------------------------------- |
| `403 access_denied` | The account isn't on the **Test users** list while the app is in Testing status |
| `redirect_uri_mismatch` | The redirect URI doesn't match exactly, including the trailing slash |
For errors that appear **after** you're back in G360, see [Troubleshooting](/g360/sso-setup#troubleshooting).
## Issuer URL
Fixed for every Google account, with nothing to look up:
```text Issuer URL theme={null}
https://accounts.google.com/.well-known/openid-configuration
```
## Next: enter the details in G360
You now have the **Client ID**, **Client Secret** and **Issuer URL**. Return to [Step 5 of the setup guide](/g360/sso-setup#step-5-enter-the-details-in-g360) to enter them, test the connection, and save.
***
## SCIM is not available with Google
Google cannot drive SCIM provisioning to any custom application, including G360, on any Google account type or plan. **There is no configuration change, on either side, that enables it** — Google's automated provisioning is limited to catalog applications with pre-built connectors.
What to do instead:
* Set **New-user provisioning** to **Create automatically on first sign-in** in the [Access Policy](/g360/sso-setup#access-policy), so accounts are created when people first sign in.
* Handle removals directly in G360 under **Administration → User & Team Management**.
***
## Provider-specific errors
If Google's own screen shows an error before you're redirected back to G360, the problem is on its side.
| Message | Meaning |
| ----------------------- | ------------------------------------------------------------------------------- |
| `403 access_denied` | The account isn't on the **Test users** list while the app is in Testing status |
| `redirect_uri_mismatch` | The redirect URI doesn't match exactly, including the trailing slash |
For errors that appear **after** you're back in G360, see [Troubleshooting](/g360/sso-setup#troubleshooting).