> ## Documentation Index
> Fetch the complete documentation index at: https://docs.heygarth.ai/llms.txt
> Use this file to discover all available pages before exploring further.
# Single Sign-On (SSO)
> Let your team sign in to G360 with your organization's identity provider instead of a G360 password.
Single sign-on lets people sign in to G360 using the account they already have with your organization's identity provider (IdP) — Microsoft Entra ID, Okta, PingOne, OneLogin, Google, or any standards-compliant OIDC provider — instead of a separate G360 password.
Once SSO is configured, your identity provider handles authentication end to end. **G360 never sees or stores your users' passwords.** Password policies, MFA, and password resets stay under your existing IT controls.
Setting up SSO is a **one-time task performed by a G360 administrator**. Individual users do not need to configure anything — they just use the **Sign in with SSO** button.
## How it works
Setting up SSO involves work on both sides of the connection.
Create an application that represents G360, so your IdP knows about G360 and which users are allowed to use it. The screens and field names differ for every provider.
Enter the credentials from that application so G360 knows which identity provider to send users to.
Once both sides are connected, a **Sign in with SSO** button appears on the G360 login page. Clicking it redirects the user to the identity provider; after authenticating there, they are redirected back into G360.
## Before you begin
The super-user account created during G360 setup, or another account with the **Admin** role. You sign in with an email address and password for this part, because the SSO button is not available until SSO has been configured.
Permission to create and configure applications in your IdP. On some providers, adding a second application for SCIM later needs a higher permission level than creating the sign-in application — this is called out on each provider's page.
For example `yourcompany.com`. Only users whose email address is on an allowed domain can sign in through SSO.
Steps 1, 2, 3, 5, 6 and 7 below are the same regardless of which identity provider you use — they all happen inside G360. **Step 4 is different for every provider**, so open your provider's page and follow it exactly.
***
## Step 1: Open SSO settings
1. Sign in to G360 with your administrator email address and password.
2. Select **Settings** under **Administration** in the left sidebar.
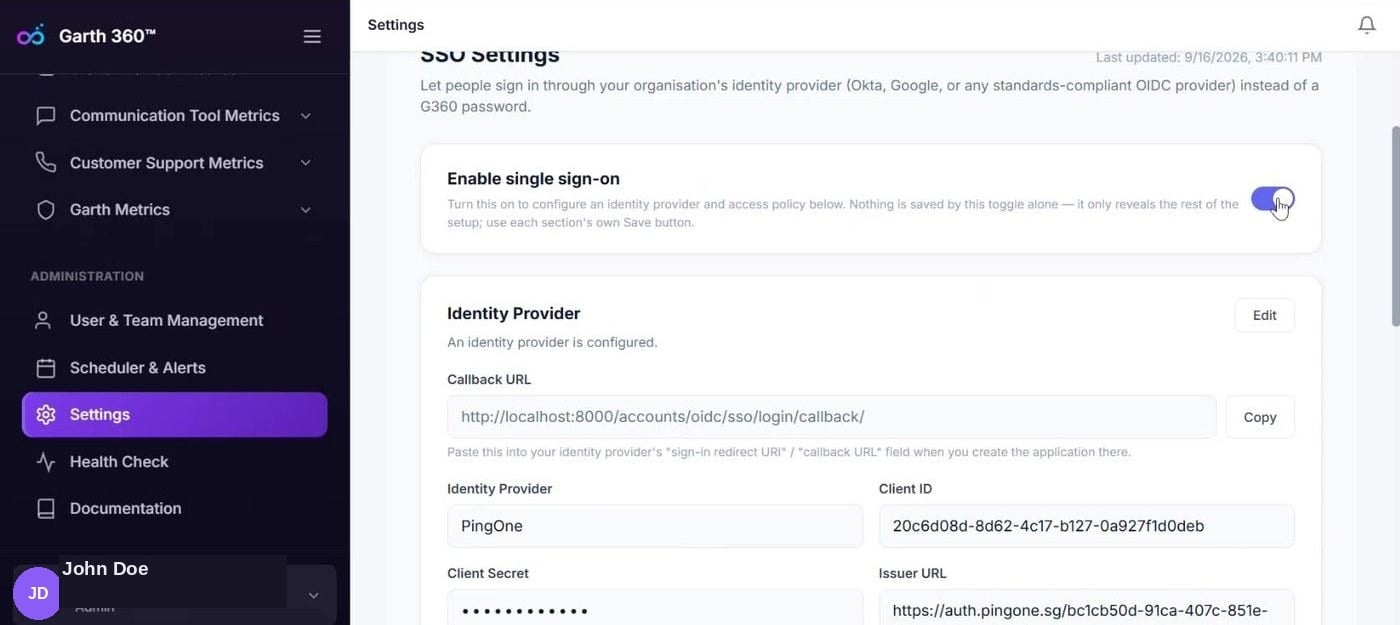
3. Open the **SSO Settings** section. The header shows when the configuration was last updated.
## Step 2: Enable single sign-on
Turn on the **Enable single sign-on** toggle.
This toggle **does not save anything on its own**. It only reveals the rest of the setup below it. Each section that follows — **Identity Provider**, **Access Policy**, and **SCIM Provisioning** — has its own Save button. Your configuration is not stored until you save the relevant section.
 ## Step 3: Copy the callback URL
With the toggle on, an **Identity Provider** section appears. At the top is a read-only **Callback URL** field with a **Copy** button.
Copy this value — you paste it into your identity provider in the next step. Depending on the provider, the field there may be called **Sign-in redirect URI**, **Callback URL**, **Redirect URI**, or **Authorized redirect URI**.
The callback URL must match **exactly** in both places, **including the trailing slash**. A mismatch is the single most common cause of a failed sign-in when everything else looks correctly configured.
## Step 4: Create an application in your identity provider
Switch to your identity provider's admin console and create an application for G360. This step is genuinely different for every provider — the console, the field names, and the traps are all vendor-specific.
Single-tenant app registration, `/v2.0/` issuer URL.
OIDC Web App, org authorization server.
OIDC Web App, Client Secret Post.
Generic OIDC connector, per-user assignment.
Google Cloud OAuth client, test users list.
Any standards-compliant OIDC provider.
### Collecting the credentials
Whichever provider you use, you should end up with these three values.
| Value | What it is |
| ----------------- | -------------------------------------------------------------------------------------------------------------------------------------------------------------------------------------- |
| **Client ID** | The public identifier for the G360 application. Usually on the application's overview or configuration page. |
| **Client Secret** | The private key that lets G360 authenticate as this application. **Every provider in this guide shows it only once, at creation** — if you didn't copy it, generate a new one. |
| **Issuer URL** | The OIDC discovery endpoint. May be listed as *OIDC Discovery Endpoint*, *Well-known Configuration*, or *Metadata URL*, and almost always ends in `/.well-known/openid-configuration`. |
## Step 3: Copy the callback URL
With the toggle on, an **Identity Provider** section appears. At the top is a read-only **Callback URL** field with a **Copy** button.
Copy this value — you paste it into your identity provider in the next step. Depending on the provider, the field there may be called **Sign-in redirect URI**, **Callback URL**, **Redirect URI**, or **Authorized redirect URI**.
The callback URL must match **exactly** in both places, **including the trailing slash**. A mismatch is the single most common cause of a failed sign-in when everything else looks correctly configured.
## Step 4: Create an application in your identity provider
Switch to your identity provider's admin console and create an application for G360. This step is genuinely different for every provider — the console, the field names, and the traps are all vendor-specific.
Single-tenant app registration, `/v2.0/` issuer URL.
OIDC Web App, org authorization server.
OIDC Web App, Client Secret Post.
Generic OIDC connector, per-user assignment.
Google Cloud OAuth client, test users list.
Any standards-compliant OIDC provider.
### Collecting the credentials
Whichever provider you use, you should end up with these three values.
| Value | What it is |
| ----------------- | -------------------------------------------------------------------------------------------------------------------------------------------------------------------------------------- |
| **Client ID** | The public identifier for the G360 application. Usually on the application's overview or configuration page. |
| **Client Secret** | The private key that lets G360 authenticate as this application. **Every provider in this guide shows it only once, at creation** — if you didn't copy it, generate a new one. |
| **Issuer URL** | The OIDC discovery endpoint. May be listed as *OIDC Discovery Endpoint*, *Well-known Configuration*, or *Metadata URL*, and almost always ends in `/.well-known/openid-configuration`. |
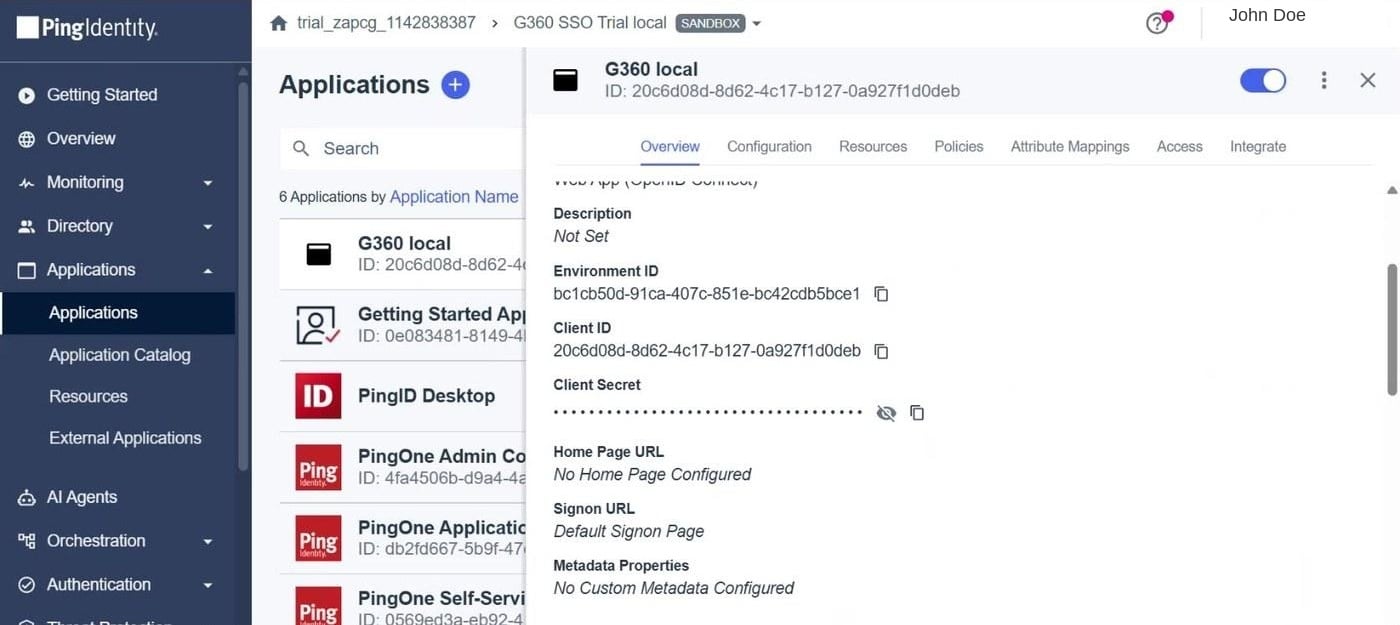 **Treat the client secret like a password.** Copy it directly into G360 — do not share it over email or chat. Confirm the issuer URL in your provider's console rather than typing it from memory; the correct URL depends on your region, tenant, and environment.
## Step 5: Enter the details in G360
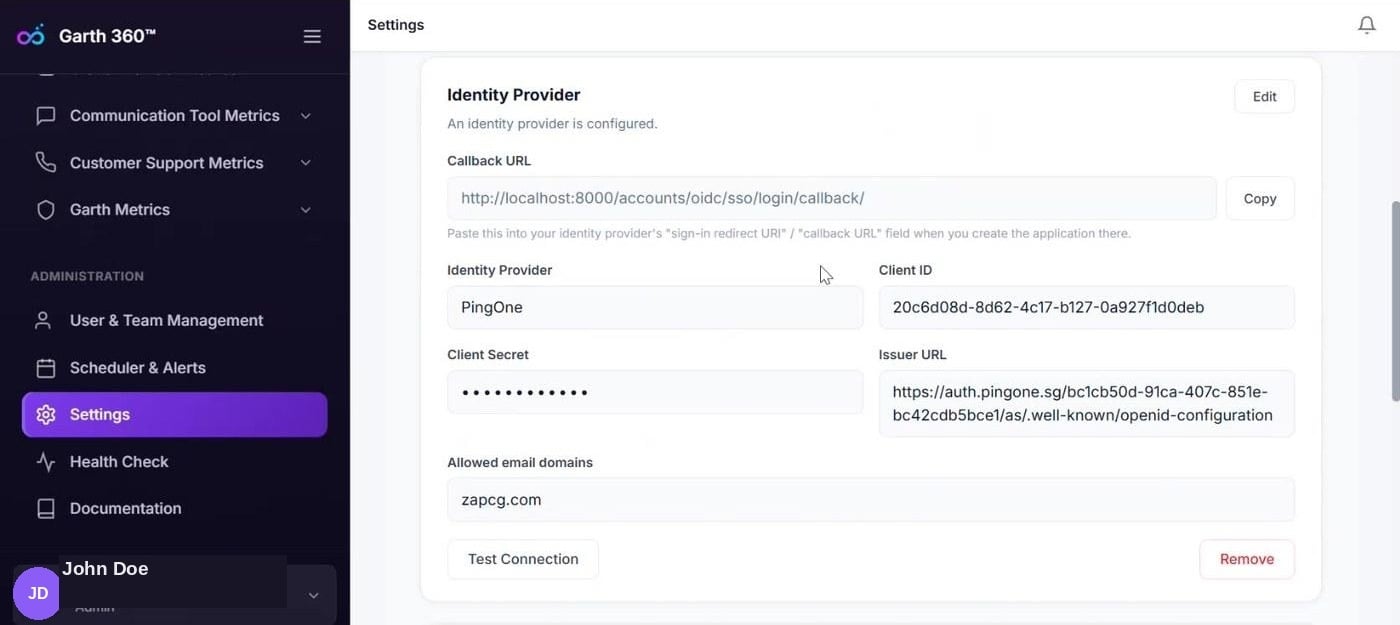
Return to **Settings → SSO Settings** and fill in the **Identity Provider** section. If a configuration already exists, click **Edit** first.
| Field | What to enter |
| ------------------------------------ | ------------------------------------------------------------------------------------------------------------------------ |
| **Identity Provider** (required) | Select your provider from the dropdown. |
| **Client ID** (required) | The client ID from the application you created. |
| **Client Secret** (required) | The client secret. Stored encrypted and masked after saving. |
| **Issuer URL** (required) | The OIDC discovery endpoint from your provider. |
| **Allowed email domains** (required) | Your organization's email domain(s), for example `yourcompany.com`. Only users on these domains can sign in through SSO. |
**Treat the client secret like a password.** Copy it directly into G360 — do not share it over email or chat. Confirm the issuer URL in your provider's console rather than typing it from memory; the correct URL depends on your region, tenant, and environment.
## Step 5: Enter the details in G360
Return to **Settings → SSO Settings** and fill in the **Identity Provider** section. If a configuration already exists, click **Edit** first.
| Field | What to enter |
| ------------------------------------ | ------------------------------------------------------------------------------------------------------------------------ |
| **Identity Provider** (required) | Select your provider from the dropdown. |
| **Client ID** (required) | The client ID from the application you created. |
| **Client Secret** (required) | The client secret. Stored encrypted and masked after saving. |
| **Issuer URL** (required) | The OIDC discovery endpoint from your provider. |
| **Allowed email domains** (required) | Your organization's email domain(s), for example `yourcompany.com`. Only users on these domains can sign in through SSO. |
 ## Step 6: Test the connection
Click **Test Connection**. G360 contacts your identity provider using the details you entered and reports the result on screen.
* **Success** — the two applications are communicating correctly. Continue.
* **Failure** — the message explains what went wrong, usually an incorrect client ID, client secret, or issuer URL. Correct the value and test again.
Test the connection **before** saving. It's much easier to catch a mistyped credential now than after users start reporting failed logins.
## Step 7: Save and verify
Save the **Identity Provider** section. Your basic SSO setup is complete, and a **Sign in with SSO** button appears on the G360 login page.
## Step 6: Test the connection
Click **Test Connection**. G360 contacts your identity provider using the details you entered and reports the result on screen.
* **Success** — the two applications are communicating correctly. Continue.
* **Failure** — the message explains what went wrong, usually an incorrect client ID, client secret, or issuer URL. Correct the value and test again.
Test the connection **before** saving. It's much easier to catch a mistyped credential now than after users start reporting failed logins.
## Step 7: Save and verify
Save the **Identity Provider** section. Your basic SSO setup is complete, and a **Sign in with SSO** button appears on the G360 login page.
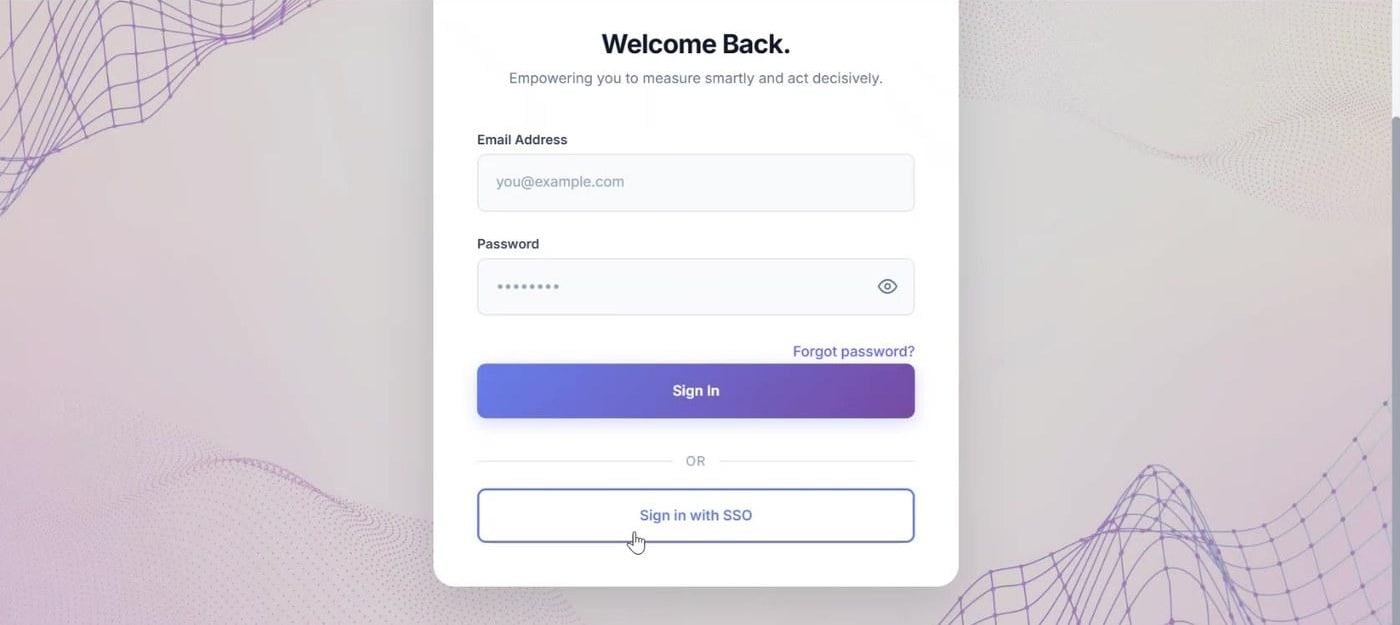 Before telling your team, verify the setup end to end:
This avoids reusing an existing session.
Confirm that you are redirected to your identity provider.
Confirm that you are redirected back into G360.
***
## Access policy
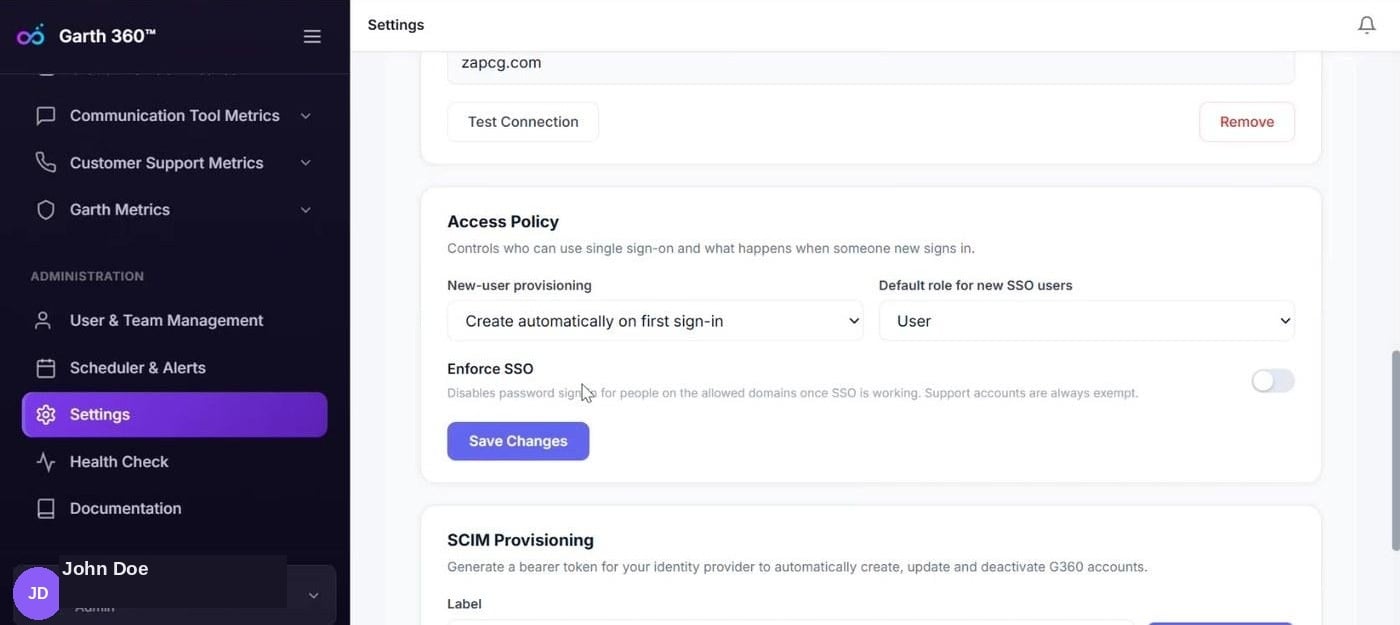
The **Access Policy** section controls who can use single sign-on and what happens when someone new signs in for the first time.
| Setting | What it does |
| ---------------------------------- | ----------------------------------------------------------------------------------------------------------------------------------------------------------------------------------------------------- |
| **New-user provisioning** | Whether a G360 account is created automatically the first time someone from an allowed domain signs in through SSO. Set to **Create automatically on first sign-in** to let users onboard themselves. |
| **Default role for new SSO users** | The role assigned to automatically created accounts. The default is **User**, the least privileged role. |
| **Enforce SSO** | Disables password sign-in for everyone on the allowed domains, making SSO the only way in. Support accounts are always exempt. |
Click **Save Changes** after configuring these settings.
Before telling your team, verify the setup end to end:
This avoids reusing an existing session.
Confirm that you are redirected to your identity provider.
Confirm that you are redirected back into G360.
***
## Access policy
The **Access Policy** section controls who can use single sign-on and what happens when someone new signs in for the first time.
| Setting | What it does |
| ---------------------------------- | ----------------------------------------------------------------------------------------------------------------------------------------------------------------------------------------------------- |
| **New-user provisioning** | Whether a G360 account is created automatically the first time someone from an allowed domain signs in through SSO. Set to **Create automatically on first sign-in** to let users onboard themselves. |
| **Default role for new SSO users** | The role assigned to automatically created accounts. The default is **User**, the least privileged role. |
| **Enforce SSO** | Disables password sign-in for everyone on the allowed domains, making SSO the only way in. Support accounts are always exempt. |
Click **Save Changes** after configuring these settings.
 ### What Enforce SSO looks like to users
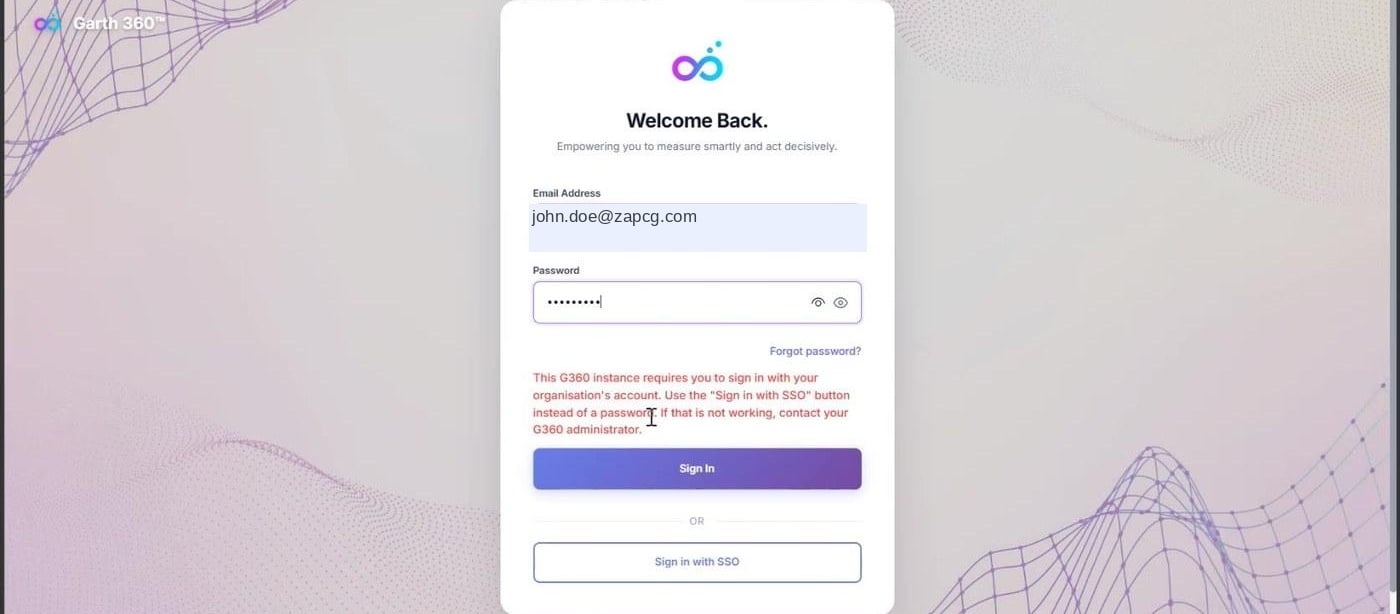
When **Enforce SSO** is enabled, anyone who tries to sign in with an email address and password sees a message on the login page telling them to use their organization's account and the **Sign in with SSO** button.
**Only enable Enforce SSO after confirming that SSO sign-in works end to end.** If the identity provider connection is broken while SSO is enforced, users lose the password fallback. Turning Enforce SSO back off restores password sign-in immediately.
### What Enforce SSO looks like to users
When **Enforce SSO** is enabled, anyone who tries to sign in with an email address and password sees a message on the login page telling them to use their organization's account and the **Sign in with SSO** button.
**Only enable Enforce SSO after confirming that SSO sign-in works end to end.** If the identity provider connection is broken while SSO is enforced, users lose the password fallback. Turning Enforce SSO back off restores password sign-in immediately.
 ## Roles and what users can see
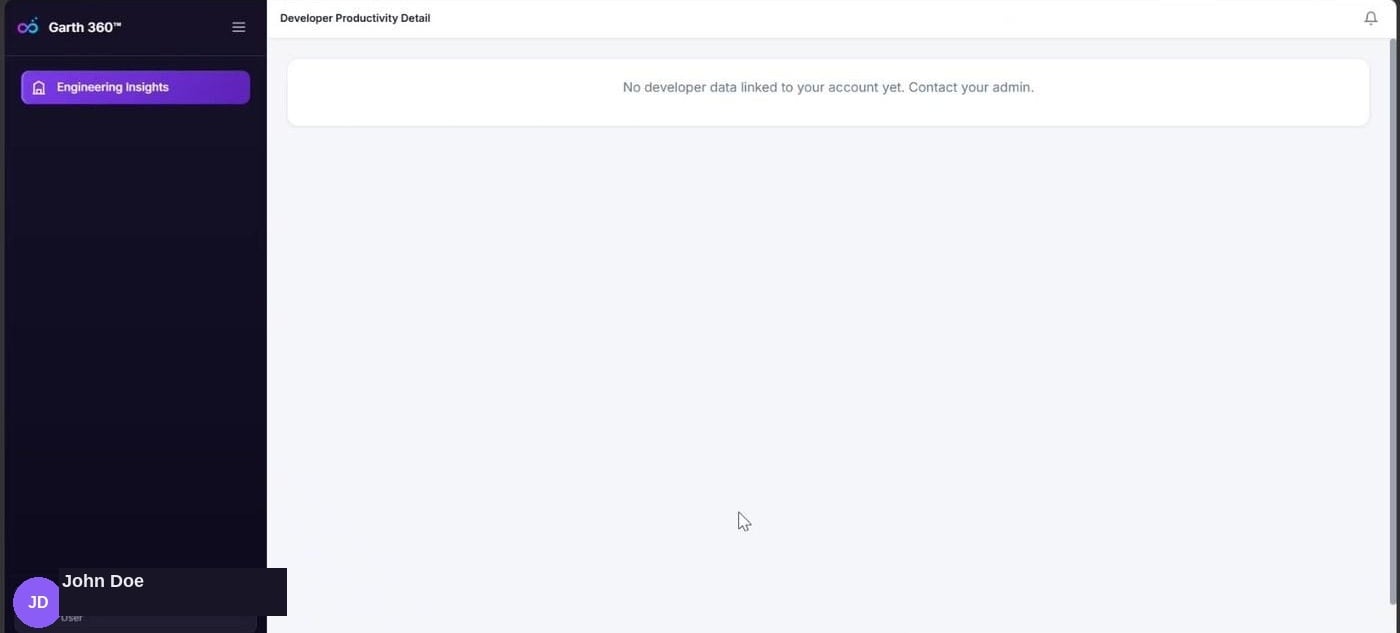
New SSO users are created with the **User** role by default. Signing in successfully does not, by itself, grant access to engineering or cost data. A user with this role sees:
> No developer data linked to your account yet. Contact your admin.
## Roles and what users can see
New SSO users are created with the **User** role by default. Signing in successfully does not, by itself, grant access to engineering or cost data. A user with this role sees:
> No developer data linked to your account yet. Contact your admin.
 To give someone broader access, assign a higher role — such as an engineering or FinOps leadership role — under [User & Team Management](/g360/manage-users). The metrics and dashboard sections a person can open depend on the role assigned to them.
A role change takes effect at the **next sign-in**. Ask the user to sign out and sign back in through SSO to receive their new access.
## Keep accounts in sync with SCIM
SCIM keeps your G360 user list automatically synchronized with your identity provider — new joiners are created, name changes flow through, and leavers are suspended without an administrator touching anything.
Provider availability, token generation, and what SCIM syncs. **Not available on every provider or plan** — check before planning a rollout around it.
***
## Signing in with SSO
This section applies to everyone in your organization, not just administrators.
Open G360 in your browser.
Use the button below the email and password fields instead of entering a password.
You are redirected to your organization's sign-in page. Enter the credentials you use for your other work applications. If your organization requires MFA or a first-time password change, you are prompted for it here — this is handled entirely by your identity provider, not by G360.
After authentication you are redirected back to G360 and taken to your dashboard.
If you see *"No developer data linked to your account yet. Contact your admin."*, your sign-in **was** successful — your account simply has not been assigned a role with access to that data. Ask your G360 administrator to update your role, then sign out and sign in again.
***
## Troubleshooting
**Possible causes**
* The client ID or client secret was copied incorrectly, or includes a leading or trailing space.
* The issuer URL points to the wrong environment, tenant, or region.
* The application in your identity provider is disabled or was never saved.
**Resolution**
* Re-copy each value using your provider's copy button instead of retyping it.
* Confirm the issuer URL ends in `/.well-known/openid-configuration` and opens in a browser.
* Check the application is enabled in your identity provider, then test again.
**Possible causes**
* **Enable single sign-on** is turned off.
* The **Identity Provider** section was filled in but never saved.
**Resolution**
* Sign in as an administrator, go to **Settings → SSO Settings**, and confirm the toggle is on.
* Re-open the Identity Provider section, confirm all fields are populated, and save it.
**Possible causes**
* The callback URL in your identity provider does not exactly match the one shown in G360.
* The user's email domain is not listed under **Allowed email domains**.
* The user is not assigned to the G360 application in the identity provider.
**Resolution**
* Copy the callback URL from G360 again and compare it character for character, including the trailing slash.
* Add the user's domain to **Allowed email domains** and save.
* Assign the user or their group to the G360 application in your identity provider.
**Possible cause** — **Enforce SSO** is enabled, which disables password sign-in for everyone on the allowed domains.
**Resolution** — This is expected behavior. Ask the user to use the **Sign in with SSO** button. If SSO itself is broken, an administrator can turn Enforce SSO off to restore password sign-in while the issue is investigated.
**Possible cause** — The account was created with the default **User** role, which provides minimal access.
**Resolution** — Assign a higher role under **Administration → User & Team Management**, then ask the user to sign out and sign in again. Role changes apply at the next sign-in.
For provider-specific error messages (`AADSTS50011`, `invalid_client`, `access_denied`, and similar), see the troubleshooting section on your provider's page.
## Best practices
* **Test before you enforce.** Verify SSO sign-in works end to end with a real account before turning on Enforce SSO.
* **Enable SCIM before onboarding at scale**, on a provider that supports it, so accounts are created, updated, and deactivated automatically from day one instead of becoming a manual backlog.
* **Keep allowed domains tight.** List only the domains your organization actually owns — every extra domain widens who can create a G360 account through SSO.
* **Rotate and revoke SCIM tokens deliberately.** Only one token can be active at a time, so plan rotations for a low-traffic window and update your identity provider immediately.
* **Review roles periodically.** New SSO users get the least privileged role by default; make sure access still matches people's current responsibilities.
* **On Entra ID, Okta and OneLogin, watch both applications.** These providers split SSO and SCIM across two separate applications. A user assigned to only one either can't sign in, or can sign in but will never be deprovisioned.
To give someone broader access, assign a higher role — such as an engineering or FinOps leadership role — under [User & Team Management](/g360/manage-users). The metrics and dashboard sections a person can open depend on the role assigned to them.
A role change takes effect at the **next sign-in**. Ask the user to sign out and sign back in through SSO to receive their new access.
## Keep accounts in sync with SCIM
SCIM keeps your G360 user list automatically synchronized with your identity provider — new joiners are created, name changes flow through, and leavers are suspended without an administrator touching anything.
Provider availability, token generation, and what SCIM syncs. **Not available on every provider or plan** — check before planning a rollout around it.
***
## Signing in with SSO
This section applies to everyone in your organization, not just administrators.
Open G360 in your browser.
Use the button below the email and password fields instead of entering a password.
You are redirected to your organization's sign-in page. Enter the credentials you use for your other work applications. If your organization requires MFA or a first-time password change, you are prompted for it here — this is handled entirely by your identity provider, not by G360.
After authentication you are redirected back to G360 and taken to your dashboard.
If you see *"No developer data linked to your account yet. Contact your admin."*, your sign-in **was** successful — your account simply has not been assigned a role with access to that data. Ask your G360 administrator to update your role, then sign out and sign in again.
***
## Troubleshooting
**Possible causes**
* The client ID or client secret was copied incorrectly, or includes a leading or trailing space.
* The issuer URL points to the wrong environment, tenant, or region.
* The application in your identity provider is disabled or was never saved.
**Resolution**
* Re-copy each value using your provider's copy button instead of retyping it.
* Confirm the issuer URL ends in `/.well-known/openid-configuration` and opens in a browser.
* Check the application is enabled in your identity provider, then test again.
**Possible causes**
* **Enable single sign-on** is turned off.
* The **Identity Provider** section was filled in but never saved.
**Resolution**
* Sign in as an administrator, go to **Settings → SSO Settings**, and confirm the toggle is on.
* Re-open the Identity Provider section, confirm all fields are populated, and save it.
**Possible causes**
* The callback URL in your identity provider does not exactly match the one shown in G360.
* The user's email domain is not listed under **Allowed email domains**.
* The user is not assigned to the G360 application in the identity provider.
**Resolution**
* Copy the callback URL from G360 again and compare it character for character, including the trailing slash.
* Add the user's domain to **Allowed email domains** and save.
* Assign the user or their group to the G360 application in your identity provider.
**Possible cause** — **Enforce SSO** is enabled, which disables password sign-in for everyone on the allowed domains.
**Resolution** — This is expected behavior. Ask the user to use the **Sign in with SSO** button. If SSO itself is broken, an administrator can turn Enforce SSO off to restore password sign-in while the issue is investigated.
**Possible cause** — The account was created with the default **User** role, which provides minimal access.
**Resolution** — Assign a higher role under **Administration → User & Team Management**, then ask the user to sign out and sign in again. Role changes apply at the next sign-in.
For provider-specific error messages (`AADSTS50011`, `invalid_client`, `access_denied`, and similar), see the troubleshooting section on your provider's page.
## Best practices
* **Test before you enforce.** Verify SSO sign-in works end to end with a real account before turning on Enforce SSO.
* **Enable SCIM before onboarding at scale**, on a provider that supports it, so accounts are created, updated, and deactivated automatically from day one instead of becoming a manual backlog.
* **Keep allowed domains tight.** List only the domains your organization actually owns — every extra domain widens who can create a G360 account through SSO.
* **Rotate and revoke SCIM tokens deliberately.** Only one token can be active at a time, so plan rotations for a low-traffic window and update your identity provider immediately.
* **Review roles periodically.** New SSO users get the least privileged role by default; make sure access still matches people's current responsibilities.
* **On Entra ID, Okta and OneLogin, watch both applications.** These providers split SSO and SCIM across two separate applications. A user assigned to only one either can't sign in, or can sign in but will never be deprovisioned.