> ## Documentation Index
> Fetch the complete documentation index at: https://docs.heygarth.ai/llms.txt
> Use this file to discover all available pages before exploring further.
# Microsoft Teams notifications
> Connect a Teams bot to G360 so alerts and reports arrive as direct messages or channel posts.
Connect a Microsoft Teams bot to G360 to send alerts and scheduled reports as direct messages or channel posts.
This page covers **Teams notifications** — G360 sending messages to Teams. The [Microsoft Teams analytics integration](/g360/teams) is separate.
## Before you start
* A Microsoft 365 administrator with access to [Teams Developer Portal](https://dev.teams.microsoft.com) and the Teams admin center.
* A G360 administrator account.
* Your G360 messaging endpoint. It must use HTTPS with a valid certificate and end with a trailing slash:
```text Messaging endpoint theme={null}
https://g360.yourcompany.com/api/v1/chat/messages/
```
Setup takes about 20 minutes, plus a few hours for Microsoft to roll out the app.
| Part | What you do | Where |
| ---- | ---------------------------- | ---------------------- |
| 1 | Create the bot | Teams Developer Portal |
| 2 | Create the app | Teams Developer Portal |
| 3 | Enter the credentials | G360 |
| 4 | Publish to your organization | Teams admin center |
| 5 | Use it in alerts and reports | G360 |
## Part 1: Create the bot
In Teams Developer Portal:
Go to **Tools → Bot management**, select **+ New Bot**, enter a name such as `G360 Alerts`, and select **Create bot**.
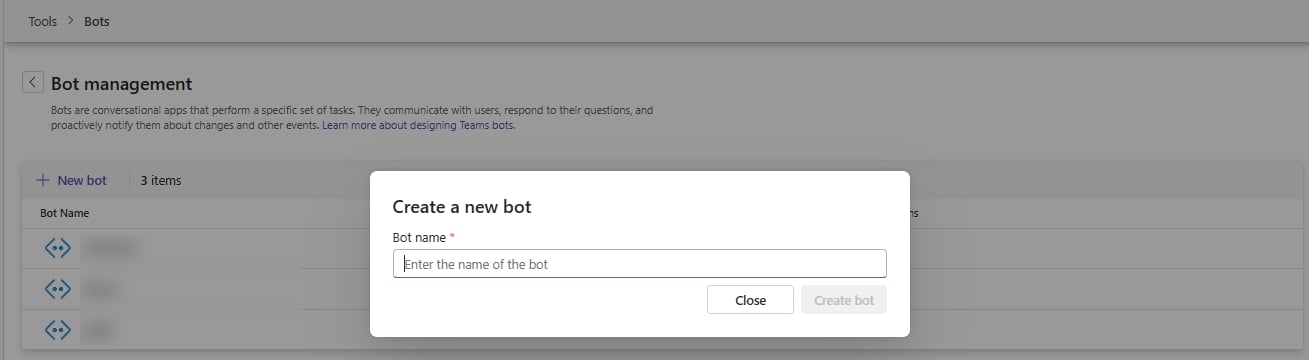 Bots created here are single tenant by default, which G360 expects.
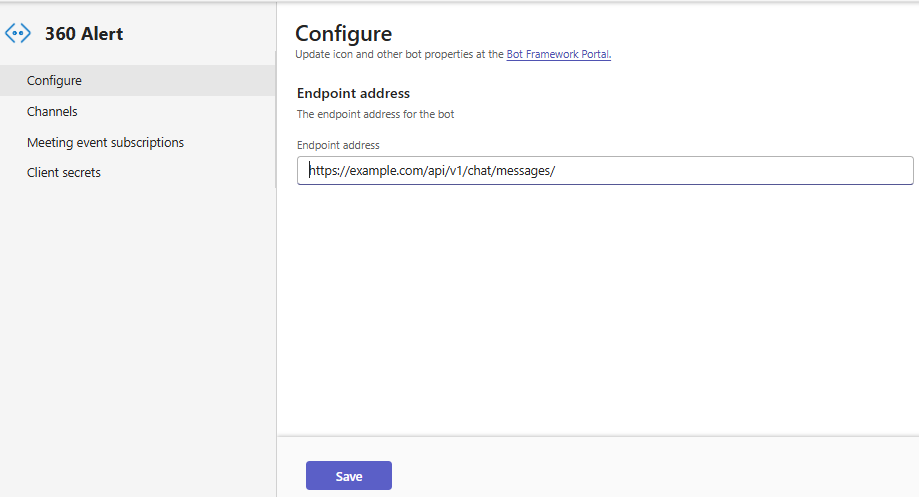
Open the bot, go to **Configure**, paste your messaging endpoint into **Endpoint address**, and select **Save**.
Bots created here are single tenant by default, which G360 expects.
Open the bot, go to **Configure**, paste your messaging endpoint into **Endpoint address**, and select **Save**.
 Go to **Client secrets**, select **Add a client secret for your bot**, and copy the secret.
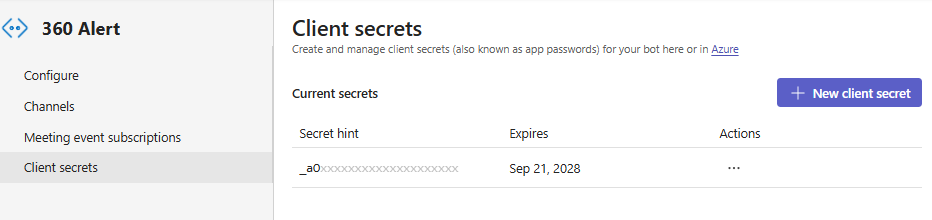 The secret is shown once. If you lose it, create another.
Copy the **Bot ID** from the bot page. You use it in the app, the manifest, and G360.
## Part 2: Create the app
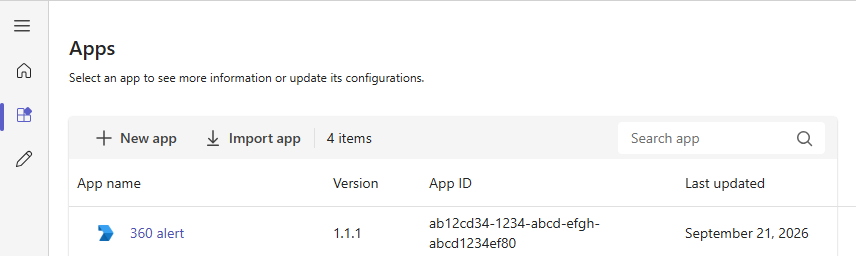
Go to **Apps**, select **+ New app**, enter a name, and select **Add**.
The secret is shown once. If you lose it, create another.
Copy the **Bot ID** from the bot page. You use it in the app, the manifest, and G360.
## Part 2: Create the app
Go to **Apps**, select **+ New app**, enter a name, and select **Add**.
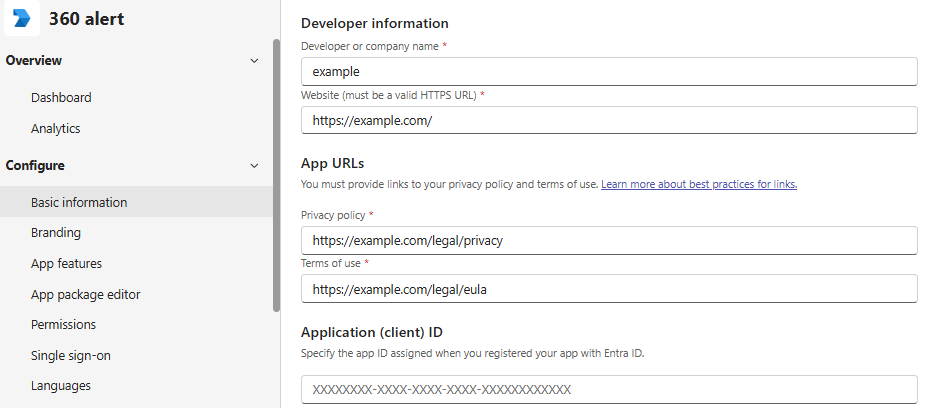
 1. Go to **Configure → Basic information** and complete every required field: short and long description, developer name, website, privacy policy URL, and terms of use URL.
2. Paste your **Bot ID** into **Application (client) ID** and select **Save**.
1. Go to **Configure → Basic information** and complete every required field: short and long description, developer name, website, privacy policy URL, and terms of use URL.
2. Paste your **Bot ID** into **Application (client) ID** and select **Save**.
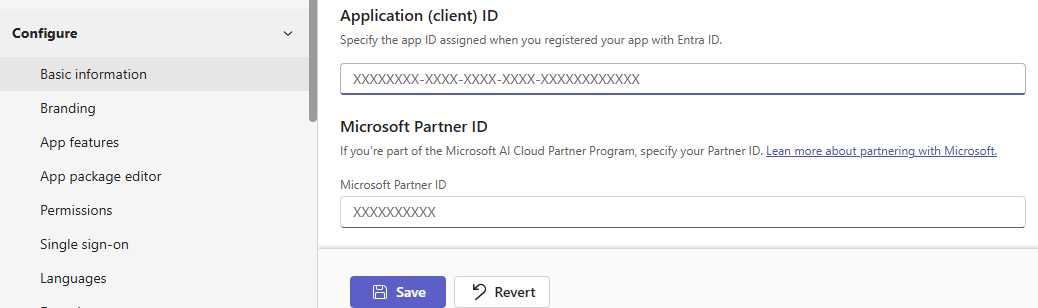 **Application (client) ID** must be the Bot ID. Any other value fails with *"RSC permissions require webApplicationInfo.appId"*.
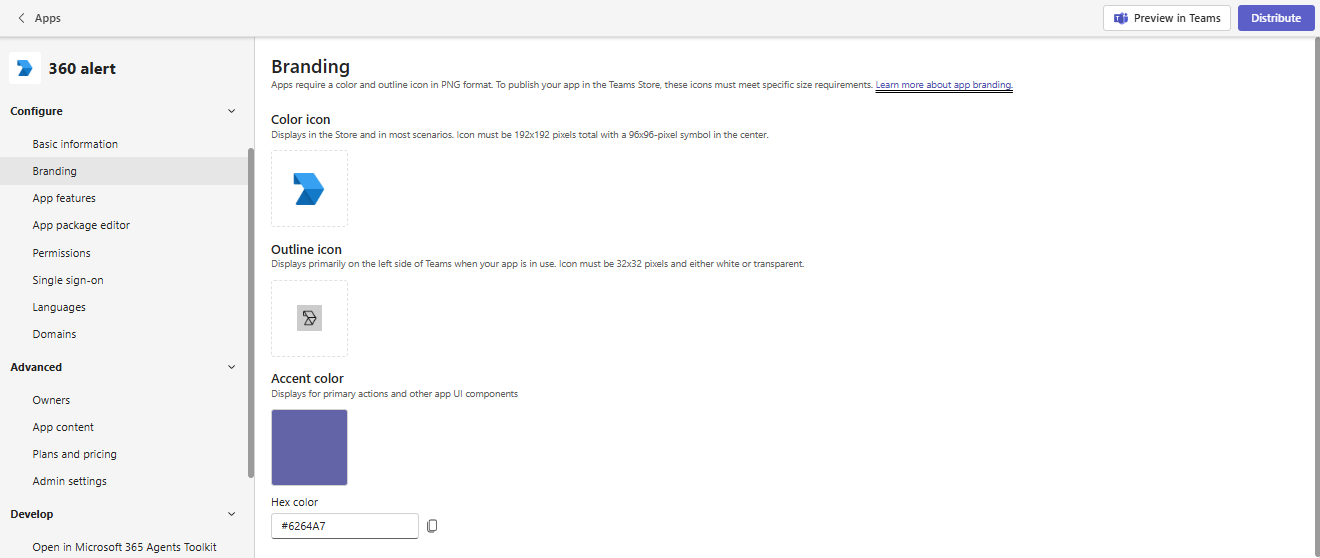
3. Go to **Configure → Branding** and upload a **Color icon** (192 × 192 px) and an **Outline icon** (32 × 32 px, transparent).
**Application (client) ID** must be the Bot ID. Any other value fails with *"RSC permissions require webApplicationInfo.appId"*.
3. Go to **Configure → Branding** and upload a **Color icon** (192 × 192 px) and an **Outline icon** (32 × 32 px, transparent).
 1. Go to **Configure → App features** and select the **Bot** tile.
2. Under **Identify your bot**, choose **Select an existing bot** and pick the bot from Part 1.
3. Under scopes, select **Personal** and **Team**, then select **Save**.
1. Go to **Configure → App features** and select the **Bot** tile.
2. Under **Identify your bot**, choose **Select an existing bot** and pick the bot from Part 1.
3. Under scopes, select **Personal** and **Team**, then select **Save**.
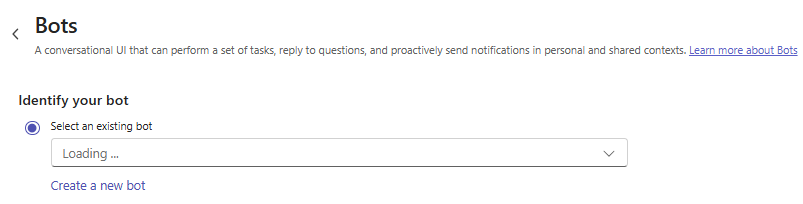
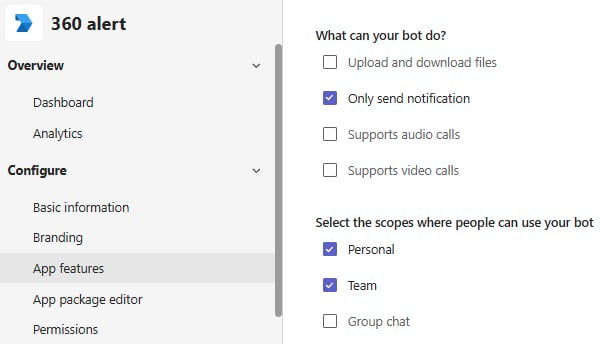 Both scopes are required. **Personal** enables direct messages. **Team** enables channel posts.
Go to **Configure → Permissions**:
1. Select **Send the user notifications**.
2. Under **Team permissions → Application**, select **TeamMember.Read.Group**.
3. Select **Save**.
Both scopes are required. **Personal** enables direct messages. **Team** enables channel posts.
Go to **Configure → Permissions**:
1. Select **Send the user notifications**.
2. Under **Team permissions → Application**, select **TeamMember.Read.Group**.
3. Select **Save**.
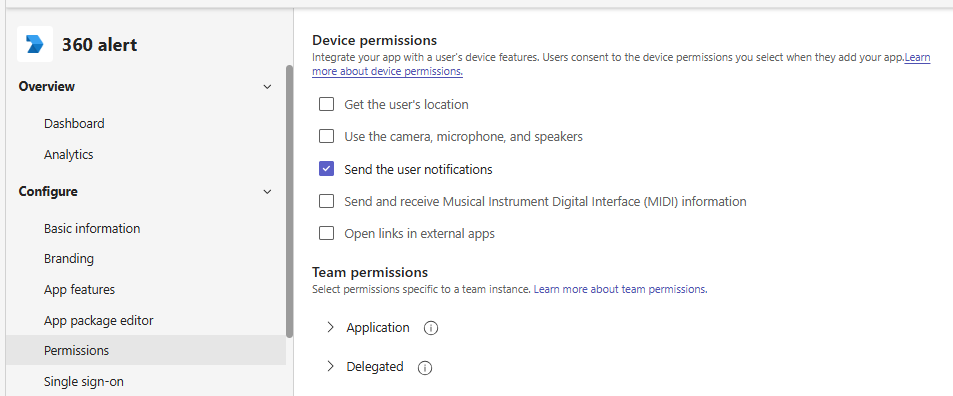 `TeamMember.Read.Group` lets G360 match Teams users to G360 users. Without it, nobody can receive direct messages.
The portal builds `manifest.json` from the settings in the previous steps. Use the [reference manifest](#app-manifest) to confirm it is correct, or to fix any field the portal forms don't set.
1. Go to **Configure → App package editor** and open `manifest.json`.
`TeamMember.Read.Group` lets G360 match Teams users to G360 users. Without it, nobody can receive direct messages.
The portal builds `manifest.json` from the settings in the previous steps. Use the [reference manifest](#app-manifest) to confirm it is correct, or to fix any field the portal forms don't set.
1. Go to **Configure → App package editor** and open `manifest.json`.
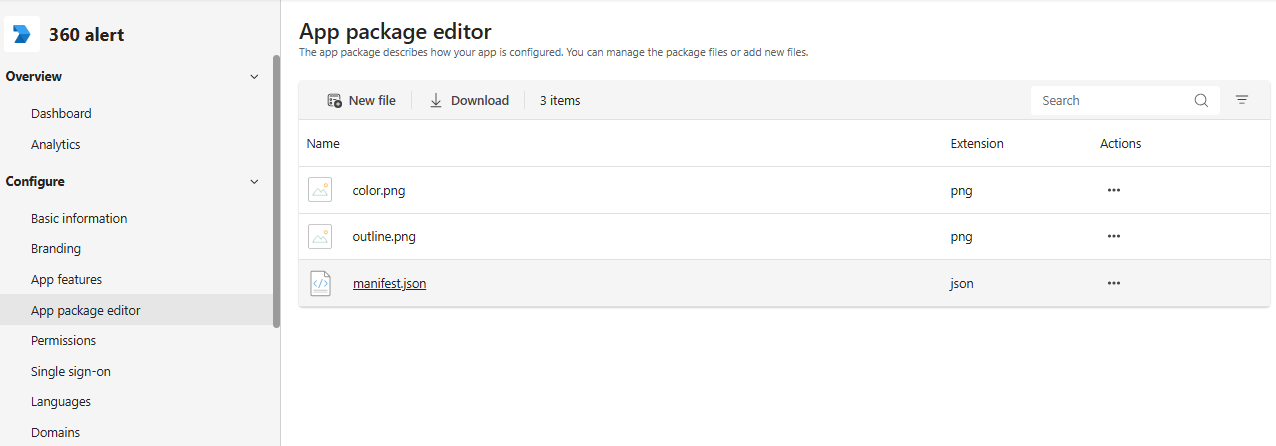 2. Compare it with the [reference manifest](#app-manifest). Check these fields in particular:
| Field | Must be |
| -------------------------------------------- | ---------------------------------------------- |
| `bots[0].botId` | Your Bot ID |
| `webApplicationInfo.id` | Your Bot ID, same as `botId` |
| `id` | The portal-generated app ID. Do not change it. |
| `bots[0].scopes` | `["personal", "team"]` |
| `supportsChannelFeatures` | `"tier1"`, in quotes |
| `authorization.permissions.resourceSpecific` | Includes `TeamMember.Read.Group` (Application) |
3. If a field differs or is missing, edit it in the editor. You can also paste the reference manifest over the file. If you do, keep the portal's `id` value, replace `YOUR-BOT-ID` in both places, and replace the `developer`, `name`, and `description` values with your own.
4. Select **Save**, then **Update**.
Go to **Publish → App package** and select **Download app package**. Keep the `.zip` file for Part 4.
## Part 3: Enter the credentials in G360
In G360, go to **Settings → Teams Settings**.
### Credentials
| Field | Value |
| --------------------------- | ---------------------------------------------------------- |
| **APPLICATION (CLIENT) ID** | Bot ID |
| **DIRECTORY (TENANT) ID** | Tenant ID from **Microsoft Entra admin center → Overview** |
| **CLIENT SECRET** | Secret from Part 1 |
| **BOT DISPLAY NAME** | Optional, for example `G360 Alerts` |
Select **Verify & save**. G360 checks the credentials with Microsoft and saves them only if they work.
2. Compare it with the [reference manifest](#app-manifest). Check these fields in particular:
| Field | Must be |
| -------------------------------------------- | ---------------------------------------------- |
| `bots[0].botId` | Your Bot ID |
| `webApplicationInfo.id` | Your Bot ID, same as `botId` |
| `id` | The portal-generated app ID. Do not change it. |
| `bots[0].scopes` | `["personal", "team"]` |
| `supportsChannelFeatures` | `"tier1"`, in quotes |
| `authorization.permissions.resourceSpecific` | Includes `TeamMember.Read.Group` (Application) |
3. If a field differs or is missing, edit it in the editor. You can also paste the reference manifest over the file. If you do, keep the portal's `id` value, replace `YOUR-BOT-ID` in both places, and replace the `developer`, `name`, and `description` values with your own.
4. Select **Save**, then **Update**.
Go to **Publish → App package** and select **Download app package**. Keep the `.zip` file for Part 4.
## Part 3: Enter the credentials in G360
In G360, go to **Settings → Teams Settings**.
### Credentials
| Field | Value |
| --------------------------- | ---------------------------------------------------------- |
| **APPLICATION (CLIENT) ID** | Bot ID |
| **DIRECTORY (TENANT) ID** | Tenant ID from **Microsoft Entra admin center → Overview** |
| **CLIENT SECRET** | Secret from Part 1 |
| **BOT DISPLAY NAME** | Optional, for example `G360 Alerts` |
Select **Verify & save**. G360 checks the credentials with Microsoft and saves them only if they work.
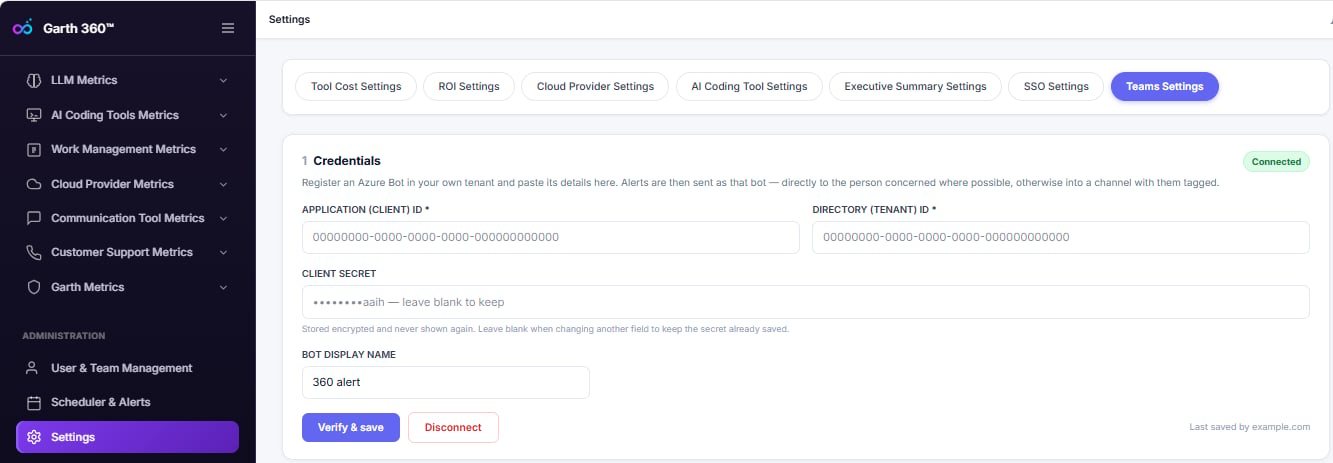 The secret is stored encrypted and never shown again. To change another field later, leave **CLIENT SECRET** blank to keep the saved one.
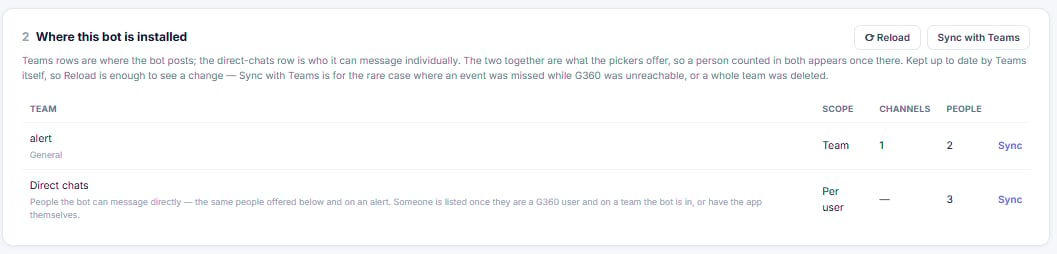
### Where this bot is installed
This section stays empty until you publish the app in Part 4.
* **Reload** — re-reads what G360 already knows, without calling Teams. Teams notifies G360 of channel and member changes, so this is usually enough.
* **Sync with Teams** — checks every team with Microsoft and removes deleted ones. Teams sends no notification when a team is deleted, so use this to clear them.
### Send a message
Pick a channel and a person, then send a test message. The test uses the same delivery path as alerts and reports, so if it works here, it works there. G360 reports each destination separately.
## Part 4: Publish to your organization
Individual users install nothing.
| Who | What | How often |
| ------------------- | -------------------------------------------- | --------- |
| Microsoft 365 admin | Uploads the app and installs it for everyone | Once |
| Team owner or admin | Adds the bot to a team for channel posts | Per team |
In the Teams admin center, go to **Teams apps → Manage apps**, select **Upload new app → Upload**, and choose your `.zip`. Some tenants show **Actions → Upload new app**.
The secret is stored encrypted and never shown again. To change another field later, leave **CLIENT SECRET** blank to keep the saved one.
### Where this bot is installed
This section stays empty until you publish the app in Part 4.
* **Reload** — re-reads what G360 already knows, without calling Teams. Teams notifies G360 of channel and member changes, so this is usually enough.
* **Sync with Teams** — checks every team with Microsoft and removes deleted ones. Teams sends no notification when a team is deleted, so use this to clear them.
### Send a message
Pick a channel and a person, then send a test message. The test uses the same delivery path as alerts and reports, so if it works here, it works there. G360 reports each destination separately.
## Part 4: Publish to your organization
Individual users install nothing.
| Who | What | How often |
| ------------------- | -------------------------------------------- | --------- |
| Microsoft 365 admin | Uploads the app and installs it for everyone | Once |
| Team owner or admin | Adds the bot to a team for channel posts | Per team |
In the Teams admin center, go to **Teams apps → Manage apps**, select **Upload new app → Upload**, and choose your `.zip`. Some tenants show **Actions → Upload new app**.
 The app can take a few hours to appear. Uploading makes the app available but does not install it for anyone.
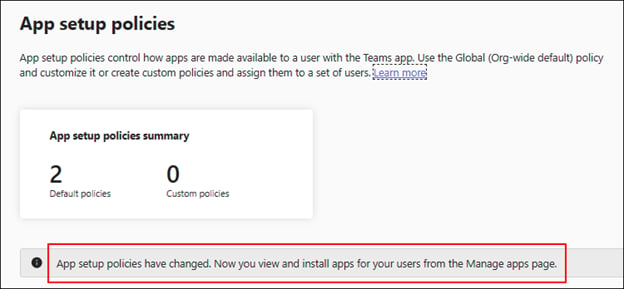
This step enables direct messages. Go to **Teams apps → Setup policies**. If there is no **Installed apps** section, use Path A. Otherwise, use Path B.
The app can take a few hours to appear. Uploading makes the app available but does not install it for anyone.
This step enables direct messages. Go to **Teams apps → Setup policies**. If there is no **Installed apps** section, use Path A. Otherwise, use Path B.
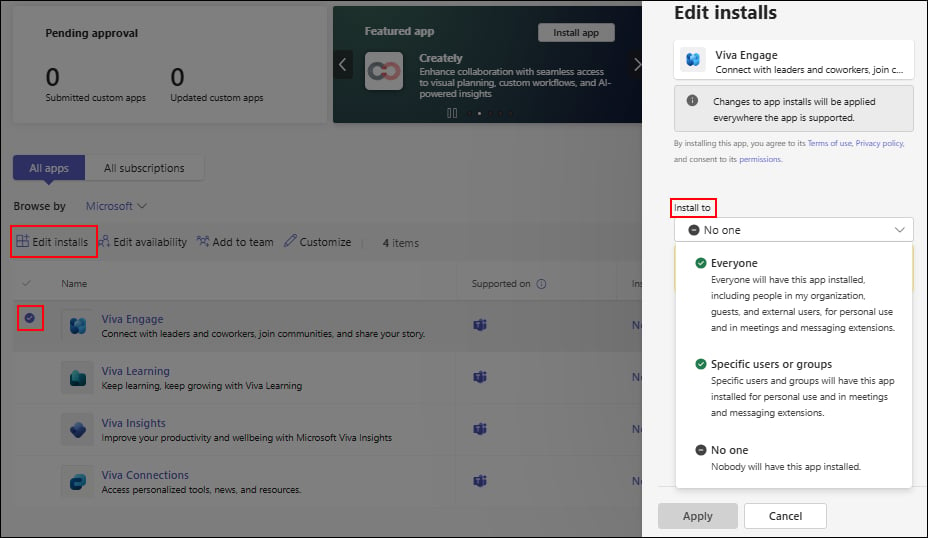
 1. Go to **Teams apps → Manage apps** and select your app.
2. Select **Edit installs**, choose everyone in your organization, and select **Apply**.
1. Go to **Teams apps → Manage apps** and select your app.
2. Select **Edit installs**, choose everyone in your organization, and select **Apply**.
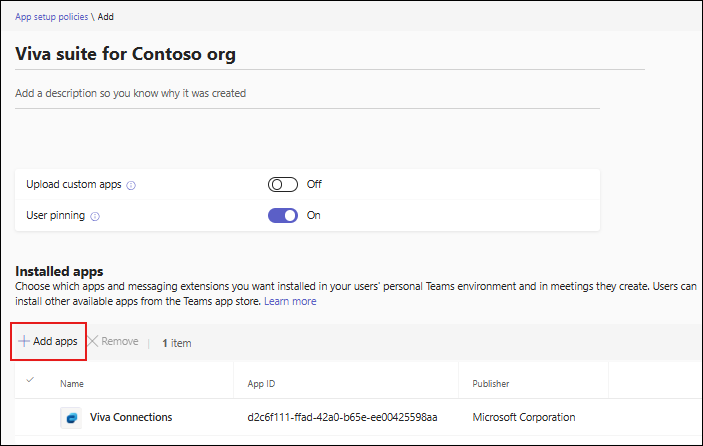
 1. Go to **Teams apps → Setup policies**, select **Global (Org-wide default)**, then **Edit**.
2. Under **Installed apps**, select **Add apps**.
3. Find your app, select **Add**, then **Save**.
1. Go to **Teams apps → Setup policies**, select **Global (Org-wide default)**, then **Edit**.
2. Under **Installed apps**, select **Add apps**.
3. Find your app, select **Add**, then **Save**.
 Changes take a few hours to reach users.
To post in a team's channels, add the app to that team.
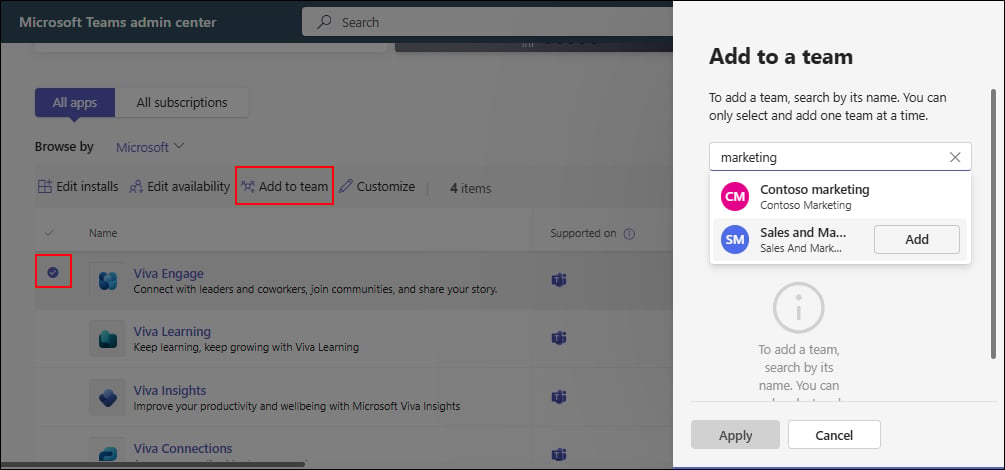
* **Admin:** in **Manage apps**, select your app → **Add to team** → pick the team → **Apply**.
* **Team owner:** in Teams, go to the team → **More options (…) → Manage team → Apps → Add an app**, and pick it from **Built for your org**.
Changes take a few hours to reach users.
To post in a team's channels, add the app to that team.
* **Admin:** in **Manage apps**, select your app → **Add to team** → pick the team → **Apply**.
* **Team owner:** in Teams, go to the team → **More options (…) → Manage team → Apps → Add an app**, and pick it from **Built for your org**.
 In G360, go to **Settings → Teams Settings** and select **Reload**. The team appears under **Where this bot is installed** within a few seconds.
 ## Part 5: Use Teams in alerts and reports
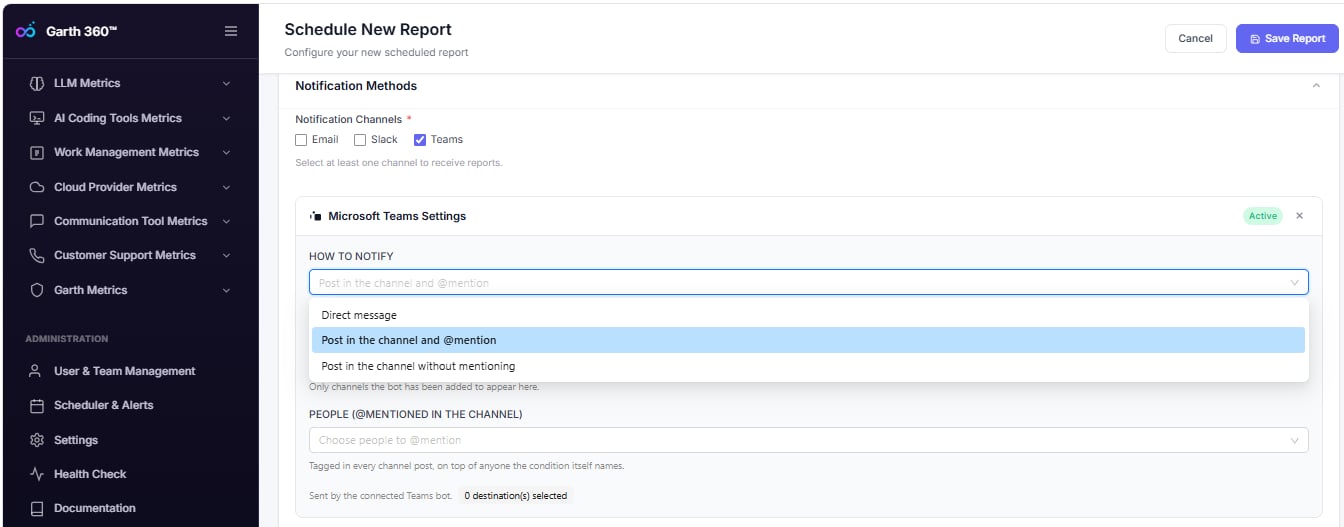
In [Schedule Alert](/g360/schedule-alert) or [Schedule Report](/g360/schedule-report), select **Teams** under **Notification Channels**, then choose how to notify:
| Option | Result |
| ------------------------------------------ | ------------------------------------------------------------------------------------ |
| **Direct message** | Private message to each person. Falls back to the channel if someone is unreachable. |
| **Post in the channel and @mention** | Posts in each channel and tags the people involved. |
| **Post in the channel without mentioning** | Posts in each channel without tags. |
## Part 5: Use Teams in alerts and reports
In [Schedule Alert](/g360/schedule-alert) or [Schedule Report](/g360/schedule-report), select **Teams** under **Notification Channels**, then choose how to notify:
| Option | Result |
| ------------------------------------------ | ------------------------------------------------------------------------------------ |
| **Direct message** | Private message to each person. Falls back to the channel if someone is unreachable. |
| **Post in the channel and @mention** | Posts in each channel and tags the people involved. |
| **Post in the channel without mentioning** | Posts in each channel without tags. |
 A person can receive direct messages only when:
* The app is installed for them (Part 4, step 2).
* Their Teams email matches their G360 login email exactly.
Anyone else does not appear in the people list, so alerts never reach the wrong person.
## Troubleshooting
**Application (client) ID** is empty or not the Bot ID. Paste the Bot ID in **Configure → Basic information** and select **Save**.
Set `"supportsChannelFeatures": "tier1"` in the App package editor. The value is a quoted string, not `true`, `false`, or `null`.
Usually a wrong icon size (192 × 192 color, 32 × 32 outline) or a required field left blank in **Basic information**.
This happens only for bots created in the Azure portal. Create the bot in Teams Developer Portal instead.
1. Confirm **APPLICATION (CLIENT) ID** in G360 equals `botId` in the manifest. G360 ignores events from any other bot, so a mismatch shows no error — the install looks fine in Teams but nothing reaches G360.
2. Confirm the bot endpoint ends in `/api/v1/chat/messages/`, including the trailing slash.
3. Wait a few hours for the app and policy changes to roll out.
4. Select **Reload**. The page does not refresh on its own.
Expected. The endpoint accepts messages only from Microsoft.
Expected. Every request needs a valid Microsoft signature. This response confirms the endpoint is reachable and the security check works.
Select **Sync with Teams**.
The alert targets a deleted channel. G360 stops sending to that channel after the first failure. Edit the alert and pick an existing channel.
Their Teams email does not match their G360 login email, or they have no G360 account.
The app is not installed for users yet. Complete Part 4, step 2, and allow time for it to take effect.
Expected. They still have the app. Access ends when they are removed from G360 or the app is uninstalled for them.
Create a new client secret in Teams Developer Portal, paste it into **CLIENT SECRET**, and select **Verify & save**.
When you contact support, send the Bot ID, the failed step, the exact error, and whether the team appears under **Where this bot is installed**. Never send the client secret.
## Reference
### App manifest
Replace `YOUR-BOT-ID` in both `bots[0].botId` and `webApplicationInfo.id`. Keep the portal-generated `id` — that is the app ID, not the Bot ID.
```json manifest.json theme={null}
{
"$schema": "https://developer.microsoft.com/jsonschemas/teams/v1.30/MicrosoftTeams.schema.json",
"manifestVersion": "1.30",
"version": "1.0.0",
"id": "APP-ID-GENERATED-BY-THE-PORTAL",
"name": { "short": "G360 Alerts", "full": "G360 Alerts" },
"developer": {
"name": "Your Company",
"websiteUrl": "https://yourcompany.com",
"privacyUrl": "https://yourcompany.com/privacy",
"termsOfUseUrl": "https://yourcompany.com/terms"
},
"description": { "short": "G360 alerts", "full": "G360 alerts" },
"icons": { "outline": "outline.png", "color": "color.png" },
"accentColor": "#6264A7",
"supportsChannelFeatures": "tier1",
"bots": [
{
"botId": "YOUR-BOT-ID",
"scopes": ["personal", "team"],
"isNotificationOnly": true,
"supportsCalling": false,
"supportsVideo": false
}
],
"validDomains": [],
"devicePermissions": ["notifications"],
"webApplicationInfo": {
"id": "YOUR-BOT-ID",
"resource": "https://yourcompany.com"
},
"authorization": {
"permissions": {
"resourceSpecific": [
{ "name": "TeamMember.Read.Group", "type": "Application" }
]
}
}
}
```
| Field | Requirement |
| ------------------------- | ------------------------------------ |
| `supportsChannelFeatures` | The string `"tier1"`, in quotes |
| `webApplicationInfo.id` | Must equal `botId` |
| `id` | The app ID, different from `botId` |
| `scopes` | Both `personal` and `team` |
| `isNotificationOnly` | `true` — the bot only sends messages |
**Attach report PDFs:** a notification-only bot cannot attach files, because Teams asks the recipient to approve each file and a notification-only bot cannot receive that answer. Set `isNotificationOnly` to `false` and add `"supportsFiles": true`. Users can then message the bot, which ignores what they send.
### Settings summary
| Item | Value |
| ----------------------- | ------------------------------------------------ |
| Messaging endpoint | `https:///api/v1/chat/messages/` |
| Bot type | Single tenant (Developer Portal default) |
| Manifest version | 1.30 |
| Bot scopes | `personal` and `team` |
| Application (client) ID | The Bot ID |
| RSC permission | `TeamMember.Read.Group` (Application) |
| Identity match | Teams email = G360 login email |
A person can receive direct messages only when:
* The app is installed for them (Part 4, step 2).
* Their Teams email matches their G360 login email exactly.
Anyone else does not appear in the people list, so alerts never reach the wrong person.
## Troubleshooting
**Application (client) ID** is empty or not the Bot ID. Paste the Bot ID in **Configure → Basic information** and select **Save**.
Set `"supportsChannelFeatures": "tier1"` in the App package editor. The value is a quoted string, not `true`, `false`, or `null`.
Usually a wrong icon size (192 × 192 color, 32 × 32 outline) or a required field left blank in **Basic information**.
This happens only for bots created in the Azure portal. Create the bot in Teams Developer Portal instead.
1. Confirm **APPLICATION (CLIENT) ID** in G360 equals `botId` in the manifest. G360 ignores events from any other bot, so a mismatch shows no error — the install looks fine in Teams but nothing reaches G360.
2. Confirm the bot endpoint ends in `/api/v1/chat/messages/`, including the trailing slash.
3. Wait a few hours for the app and policy changes to roll out.
4. Select **Reload**. The page does not refresh on its own.
Expected. The endpoint accepts messages only from Microsoft.
Expected. Every request needs a valid Microsoft signature. This response confirms the endpoint is reachable and the security check works.
Select **Sync with Teams**.
The alert targets a deleted channel. G360 stops sending to that channel after the first failure. Edit the alert and pick an existing channel.
Their Teams email does not match their G360 login email, or they have no G360 account.
The app is not installed for users yet. Complete Part 4, step 2, and allow time for it to take effect.
Expected. They still have the app. Access ends when they are removed from G360 or the app is uninstalled for them.
Create a new client secret in Teams Developer Portal, paste it into **CLIENT SECRET**, and select **Verify & save**.
When you contact support, send the Bot ID, the failed step, the exact error, and whether the team appears under **Where this bot is installed**. Never send the client secret.
## Reference
### App manifest
Replace `YOUR-BOT-ID` in both `bots[0].botId` and `webApplicationInfo.id`. Keep the portal-generated `id` — that is the app ID, not the Bot ID.
```json manifest.json theme={null}
{
"$schema": "https://developer.microsoft.com/jsonschemas/teams/v1.30/MicrosoftTeams.schema.json",
"manifestVersion": "1.30",
"version": "1.0.0",
"id": "APP-ID-GENERATED-BY-THE-PORTAL",
"name": { "short": "G360 Alerts", "full": "G360 Alerts" },
"developer": {
"name": "Your Company",
"websiteUrl": "https://yourcompany.com",
"privacyUrl": "https://yourcompany.com/privacy",
"termsOfUseUrl": "https://yourcompany.com/terms"
},
"description": { "short": "G360 alerts", "full": "G360 alerts" },
"icons": { "outline": "outline.png", "color": "color.png" },
"accentColor": "#6264A7",
"supportsChannelFeatures": "tier1",
"bots": [
{
"botId": "YOUR-BOT-ID",
"scopes": ["personal", "team"],
"isNotificationOnly": true,
"supportsCalling": false,
"supportsVideo": false
}
],
"validDomains": [],
"devicePermissions": ["notifications"],
"webApplicationInfo": {
"id": "YOUR-BOT-ID",
"resource": "https://yourcompany.com"
},
"authorization": {
"permissions": {
"resourceSpecific": [
{ "name": "TeamMember.Read.Group", "type": "Application" }
]
}
}
}
```
| Field | Requirement |
| ------------------------- | ------------------------------------ |
| `supportsChannelFeatures` | The string `"tier1"`, in quotes |
| `webApplicationInfo.id` | Must equal `botId` |
| `id` | The app ID, different from `botId` |
| `scopes` | Both `personal` and `team` |
| `isNotificationOnly` | `true` — the bot only sends messages |
**Attach report PDFs:** a notification-only bot cannot attach files, because Teams asks the recipient to approve each file and a notification-only bot cannot receive that answer. Set `isNotificationOnly` to `false` and add `"supportsFiles": true`. Users can then message the bot, which ignores what they send.
### Settings summary
| Item | Value |
| ----------------------- | ------------------------------------------------ |
| Messaging endpoint | `https:///api/v1/chat/messages/` |
| Bot type | Single tenant (Developer Portal default) |
| Manifest version | 1.30 |
| Bot scopes | `personal` and `team` |
| Application (client) ID | The Bot ID |
| RSC permission | `TeamMember.Read.Group` (Application) |
| Identity match | Teams email = G360 login email |