> ## Documentation Index
> Fetch the complete documentation index at: https://docs.heygarth.ai/llms.txt
> Use this file to discover all available pages before exploring further.
# Azure DevOps
> Connect Garth to your Azure DevOps pipeline using a Personal Access Token for intelligent, automated pull request analysis.
Garth integrates with Azure DevOps to deliver:
* **Instant code reviews** on active pull requests.
* **Actionable inline suggestions** on every diff.
* **Smooth alignment** with standard Azure enterprise workflows.
## Step 1: Create the integration account
Create a **dedicated Azure DevOps service account** for Garth rather than
binding the integration to a personal staff account.
Log out of your personal Azure DevOps account and create a new user specifically for this integration.
* Set the username to something identifiable, such as `GPRABot`. - Use a team
alias email rather than a personal address. - Enable Two-Step Verification
(2FA) if required by your company policy.
Add the new service account to your primary Azure DevOps organization and the projects you want Garth to analyze.
The PAT account must have the **Project Administrators** role on every project you want to integrate. Without it, repository installation and webhook setup will fail.
When you rotate the service account later, update the token in Garth and
re-enable repository tracking — no other reconfiguration is needed.
## Step 2: Create a Personal Access Token (PAT)
Ensure you are logged into Azure DevOps using the dedicated Garth service account.
Navigate to **Edit Profile** and select **Personal access tokens**.
Click **New token** and give it a descriptive name such as `Garth PR Token`.
For production use, set the expiration to **1 year**.
Grant exactly the following permissions:
| Scope | Access |
| ----------------------------- | ------------ |
| Build | Read |
| Code | Read & Write |
| Identity | Read |
| Member Entitlement Management | Read |
| Pull Request Threads | Read & Write |
| Work Items | Read |
Copy the token immediately after generation — **Azure DevOps displays it only once**. Store it in a secure location.
## Step 3: Link to Garth
Log into the [Garth dashboard](https://app.heygarth.ai/) and navigate to [Settings → Integrations](https://app.heygarth.ai/settings/integrations).
Select the **Azure DevOps** tab. Enter your **Azure DevOps URL**
(`https://dev.azure.com/your-organization`), **Username** (the service
account's email), and **Personal Access Token**, then click **Validate**.
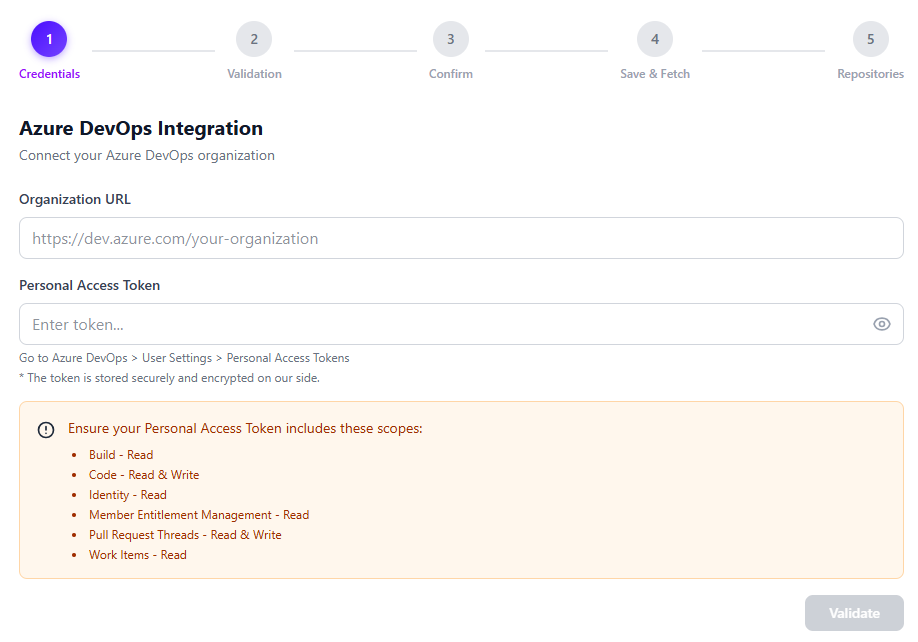 After validation, select the repositories you want Garth to review and click **Install Repositories**.
**Automatic webhooks:** Garth installs webhooks on selected Azure DevOps projects automatically. No manual webhook configuration is required. Webhooks are also removed automatically when you uninstall a repository.
## Step 4: Activate and configure the repository
After installation, activate each repository under [Agent Setup → PR Review → Repository Setup](https://app.heygarth.ai/agents/pr-review/repository-setup).
Once a repository is activated, you can configure the following options:
1. **Files to Exclude** — specify file patterns that Garth should skip during reviews.
2. **Source Branches to Exclude** — exclude PRs originating from certain branches.
3. **Destination Branches to Exclude** — exclude PRs targeting certain branches.
4. **Auto Review** — enable or disable automatic reviews for new PRs on this repository.
5. **Repository PR Review Guidelines** — define custom review guidelines specific to this repository.
## Troubleshooting
If Garth is not accessing repositories or reviewing pull requests:
1. **Check webhook status** — go to your Azure DevOps project settings under **Service Hooks** and verify the Garth webhook exists and is active.
2. **Manually delete the webhook** if it exists but is not working.
3. **Refresh the repository page** in the Garth app.
4. **Reinstall the webhook** — untoggle and re-toggle the repository in the Garth dashboard.
If you cannot install Garth on a repository:
1. **Verify permission levels** — the service account must hold **Project Administrator** or **Project Collection Administrator** permissions.
2. **Check token scopes** — confirm the PAT includes **Code: Read & Write** and **Work Items: Read** capabilities.
3. **Re-validate the token** — go to **Settings → Integrations → Azure DevOps** in Garth and re-enter your credentials.
4. **Toggle the repository** — uninstall and reinstall the repository from the Garth app to force a fresh webhook setup.
If Garth is installed but you are not receiving any reviews on your pull requests:
1. **Check repository activation** — go to [Agent Setup → PR Review → Repository Setup](https://app.heygarth.ai/agents/pr-review/repository-setup) and confirm the repository is activated.
2. **Verify Auto Review is enabled** — ensure the **Auto Review** toggle is turned on for the repository.
3. **Check branch exclusions** — confirm the source or destination branch of your PR is not listed under **Source Branches to Exclude** or **Destination Branches to Exclude**.
4. **Check file exclusions** — verify that the files changed in your PR are not covered by patterns in **Files to Exclude**.
If you receive authentication or permission errors:
1. **Check token expiry** — Azure DevOps PATs expire based on the timeframe you set; regenerate and update the token in Garth if it has lapsed.
2. **Confirm Entra ID is enabled** — your organization must have Entra ID (formerly Azure Active Directory) active for the integration to function.
3. **Verify Microsoft App Consent** — confirm your IT administrator has approved the Garth application in the Microsoft consent portal if administrative approval is required.
4. **Re-authenticate** — update the PAT in **Settings → Integrations → Azure DevOps** within Garth and re-link with a freshly generated token.
After validation, select the repositories you want Garth to review and click **Install Repositories**.
**Automatic webhooks:** Garth installs webhooks on selected Azure DevOps projects automatically. No manual webhook configuration is required. Webhooks are also removed automatically when you uninstall a repository.
## Step 4: Activate and configure the repository
After installation, activate each repository under [Agent Setup → PR Review → Repository Setup](https://app.heygarth.ai/agents/pr-review/repository-setup).
Once a repository is activated, you can configure the following options:
1. **Files to Exclude** — specify file patterns that Garth should skip during reviews.
2. **Source Branches to Exclude** — exclude PRs originating from certain branches.
3. **Destination Branches to Exclude** — exclude PRs targeting certain branches.
4. **Auto Review** — enable or disable automatic reviews for new PRs on this repository.
5. **Repository PR Review Guidelines** — define custom review guidelines specific to this repository.
## Troubleshooting
If Garth is not accessing repositories or reviewing pull requests:
1. **Check webhook status** — go to your Azure DevOps project settings under **Service Hooks** and verify the Garth webhook exists and is active.
2. **Manually delete the webhook** if it exists but is not working.
3. **Refresh the repository page** in the Garth app.
4. **Reinstall the webhook** — untoggle and re-toggle the repository in the Garth dashboard.
If you cannot install Garth on a repository:
1. **Verify permission levels** — the service account must hold **Project Administrator** or **Project Collection Administrator** permissions.
2. **Check token scopes** — confirm the PAT includes **Code: Read & Write** and **Work Items: Read** capabilities.
3. **Re-validate the token** — go to **Settings → Integrations → Azure DevOps** in Garth and re-enter your credentials.
4. **Toggle the repository** — uninstall and reinstall the repository from the Garth app to force a fresh webhook setup.
If Garth is installed but you are not receiving any reviews on your pull requests:
1. **Check repository activation** — go to [Agent Setup → PR Review → Repository Setup](https://app.heygarth.ai/agents/pr-review/repository-setup) and confirm the repository is activated.
2. **Verify Auto Review is enabled** — ensure the **Auto Review** toggle is turned on for the repository.
3. **Check branch exclusions** — confirm the source or destination branch of your PR is not listed under **Source Branches to Exclude** or **Destination Branches to Exclude**.
4. **Check file exclusions** — verify that the files changed in your PR are not covered by patterns in **Files to Exclude**.
If you receive authentication or permission errors:
1. **Check token expiry** — Azure DevOps PATs expire based on the timeframe you set; regenerate and update the token in Garth if it has lapsed.
2. **Confirm Entra ID is enabled** — your organization must have Entra ID (formerly Azure Active Directory) active for the integration to function.
3. **Verify Microsoft App Consent** — confirm your IT administrator has approved the Garth application in the Microsoft consent portal if administrative approval is required.
4. **Re-authenticate** — update the PAT in **Settings → Integrations → Azure DevOps** within Garth and re-link with a freshly generated token.