> ## Documentation Index
> Fetch the complete documentation index at: https://docs.heygarth.ai/llms.txt
> Use this file to discover all available pages before exploring further.
# Bitbucket
> Connect Garth to your Bitbucket Cloud repositories for AI-driven pull request reviews and inline code feedback.
Garth enhances your Bitbucket Cloud workflow with:
* **Real-time pull request checks** — immediate scanning of new PRs.
* **Inline feedback** — actionable suggestions attached directly to your diffs.
* **Automatic webhooks** — event-driven architecture with no manual webhook setup required.
## Step 1: Create the integration account
Create a **dedicated Bitbucket service account** for Garth rather than binding
the integration to a personal account. Code reviews will be attributed to this
account.
Log out of your personal Bitbucket account and create a new user specifically for this integration.
* Set the username to something identifiable, such as `GPRABot`. - Use a team
alias email rather than a personal address. - Enable Two-Step Verification
(2FA) if required by your company policy.
Add the new service account to your primary Bitbucket workspace and grant it at minimum `Developer` access on the projects you want Garth to analyze.
When you rotate the service account later, update the token in Garth and
re-enable repository tracking — no other reconfiguration is needed.
## Step 2: Create an API token
Ensure you are logged into Bitbucket using the dedicated Garth service account.
Go to **Personal settings** and select **API Tokens** under the Access
Management section.
Click **Create token** and give it a descriptive label such as `Garth PR
Token`.
Grant the following permissions:
| Access | Scopes |
| ---------- | ------------------------------------------------------------------------------------------------------------------------------------------------- |
| **Read** | `read:repository:bitbucket` `read:pullrequest:bitbucket` `read:webhook:bitbucket` `read:workspace:bitbucket` `read:user:bitbucket` `read:account` |
| **Write** | `write:repository:bitbucket` `write:pullrequest:bitbucket` `write:webhook:bitbucket` |
| **Admin** | `admin:repository:bitbucket` `admin:workspace:bitbucket` |
| **Delete** | `delete:webhook:bitbucket` |
Copy the token immediately after creation — **Bitbucket displays it only once**. Store it in a secure location.
## Step 3: Link to Garth
Log into the [Garth dashboard](https://app.heygarth.ai/) and navigate to [Settings → Integrations](https://app.heygarth.ai/settings/integrations).
Select the **Bitbucket** tab. Enter your **Bitbucket URL**
(`https://bitbucket.org/your-workspace`), **Username** (the service account's
email), and **Personal Access Token**, then click **Validate**.
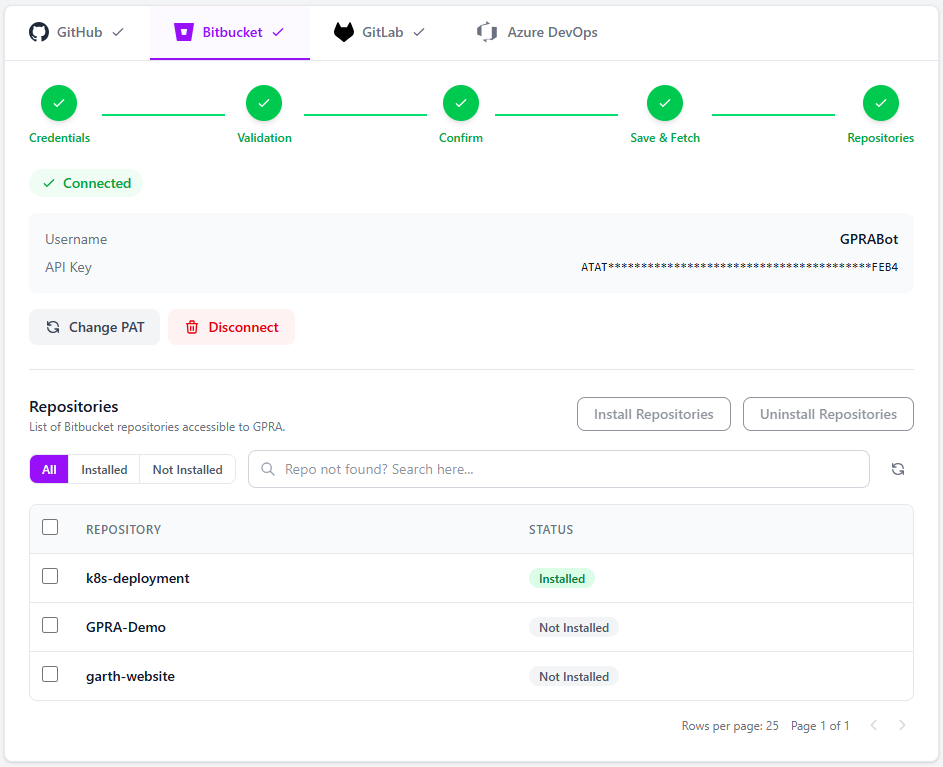
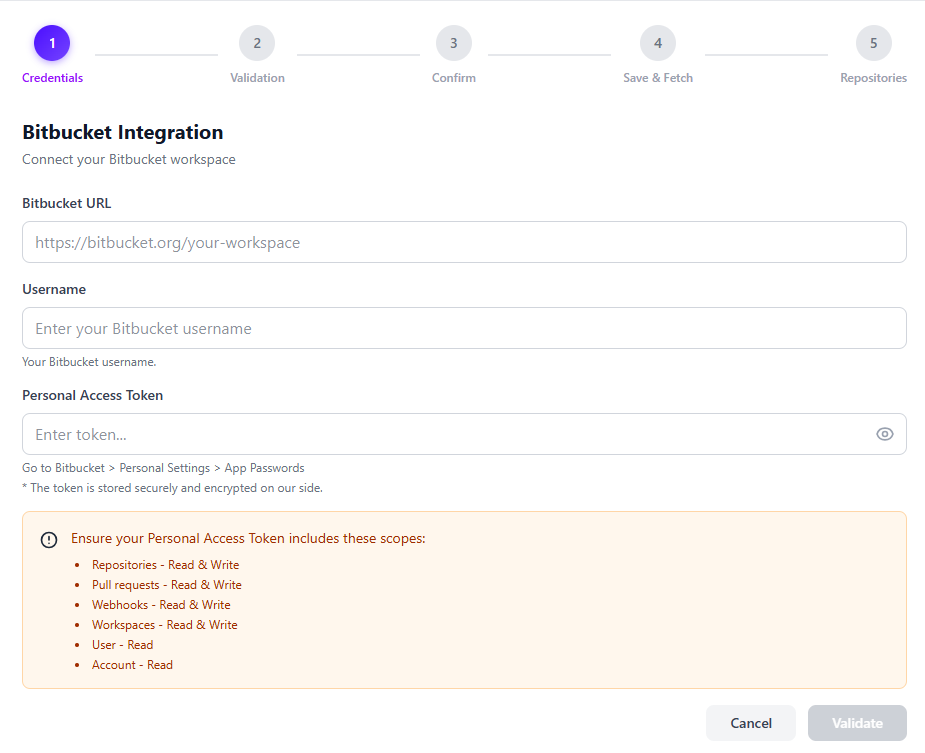 After validation, select the repositories you want Garth to review and click **Install Repositories**.
**Automatic webhooks:** Garth installs webhooks on selected repositories automatically. No manual webhook configuration is required. Webhooks are also removed automatically when you uninstall a repository.
After validation, select the repositories you want Garth to review and click **Install Repositories**.
**Automatic webhooks:** Garth installs webhooks on selected repositories automatically. No manual webhook configuration is required. Webhooks are also removed automatically when you uninstall a repository.
 ## Step 4: Activate and configure the repository
After installation, activate each repository under [Agent Setup → PR Review → Repository Setup](https://app.heygarth.ai/agents/pr-review/repository-setup).
Once a repository is activated, you can configure the following options:
1. **Files to Exclude** — specify file patterns that Garth should skip during reviews.
2. **Source Branches to Exclude** — exclude PRs originating from certain branches.
3. **Destination Branches to Exclude** — exclude PRs targeting certain branches.
4. **Auto Review** — enable or disable automatic reviews for new PRs on this repository.
5. **Repository PR Review Guidelines** — define custom review guidelines specific to this repository.
## Troubleshooting
If Garth is not accessing repositories or reviewing pull requests:
1. **Check webhook status** — go to your Bitbucket repository settings and verify the Garth webhook exists and is active.
2. **Manually delete the webhook** if it exists but is not working.
3. **Refresh the repository page** in the Garth app.
4. **Reinstall the webhook** — uninstall and reinstall the repository from the Garth dashboard.
If you cannot install Garth on a repository:
1. **Verify workspace membership** — confirm the service account is in the Bitbucket workspace with at least `Developer` access.
2. **Check token scopes** — confirm all required scopes (especially `admin:workspace:bitbucket` and `write:repository:bitbucket`) are granted.
3. **Re-validate the token** — go to **Settings → Integrations → Bitbucket** in Garth and re-enter your credentials.
4. **Toggle the repository** — uninstall and reinstall the repository from the Garth app to force a fresh webhook setup.
If Garth is installed but you are not receiving any reviews on your pull requests:
1. **Check repository activation** — go to [Agent Setup → PR Review → Repository Setup](https://app.heygarth.ai/agents/pr-review/repository-setup) and confirm the repository is activated.
2. **Verify Auto Review is enabled** — ensure the **Auto Review** toggle is turned on for the repository.
3. **Check branch exclusions** — confirm the source or destination branch of your PR is not listed under **Source Branches to Exclude** or **Destination Branches to Exclude**.
4. **Check file exclusions** — verify that the files changed in your PR are not covered by patterns in **Files to Exclude**.
If you receive authentication or permission errors:
1. **Check token expiry** — Bitbucket API tokens can expire; regenerate and update the token in Garth if needed.
2. **Confirm the username field** — the **Username** entered during setup must be the service account's email address, not a display name.
3. **Verify 2FA compatibility** — if Two-Step Verification is enabled, confirm the API token was generated under **Personal Settings → API Tokens**, not via a password-based approach.
4. **Re-authenticate** — update the token in the Bitbucket integration settings in Garth and re-link with a freshly generated token.
## Step 4: Activate and configure the repository
After installation, activate each repository under [Agent Setup → PR Review → Repository Setup](https://app.heygarth.ai/agents/pr-review/repository-setup).
Once a repository is activated, you can configure the following options:
1. **Files to Exclude** — specify file patterns that Garth should skip during reviews.
2. **Source Branches to Exclude** — exclude PRs originating from certain branches.
3. **Destination Branches to Exclude** — exclude PRs targeting certain branches.
4. **Auto Review** — enable or disable automatic reviews for new PRs on this repository.
5. **Repository PR Review Guidelines** — define custom review guidelines specific to this repository.
## Troubleshooting
If Garth is not accessing repositories or reviewing pull requests:
1. **Check webhook status** — go to your Bitbucket repository settings and verify the Garth webhook exists and is active.
2. **Manually delete the webhook** if it exists but is not working.
3. **Refresh the repository page** in the Garth app.
4. **Reinstall the webhook** — uninstall and reinstall the repository from the Garth dashboard.
If you cannot install Garth on a repository:
1. **Verify workspace membership** — confirm the service account is in the Bitbucket workspace with at least `Developer` access.
2. **Check token scopes** — confirm all required scopes (especially `admin:workspace:bitbucket` and `write:repository:bitbucket`) are granted.
3. **Re-validate the token** — go to **Settings → Integrations → Bitbucket** in Garth and re-enter your credentials.
4. **Toggle the repository** — uninstall and reinstall the repository from the Garth app to force a fresh webhook setup.
If Garth is installed but you are not receiving any reviews on your pull requests:
1. **Check repository activation** — go to [Agent Setup → PR Review → Repository Setup](https://app.heygarth.ai/agents/pr-review/repository-setup) and confirm the repository is activated.
2. **Verify Auto Review is enabled** — ensure the **Auto Review** toggle is turned on for the repository.
3. **Check branch exclusions** — confirm the source or destination branch of your PR is not listed under **Source Branches to Exclude** or **Destination Branches to Exclude**.
4. **Check file exclusions** — verify that the files changed in your PR are not covered by patterns in **Files to Exclude**.
If you receive authentication or permission errors:
1. **Check token expiry** — Bitbucket API tokens can expire; regenerate and update the token in Garth if needed.
2. **Confirm the username field** — the **Username** entered during setup must be the service account's email address, not a display name.
3. **Verify 2FA compatibility** — if Two-Step Verification is enabled, confirm the API token was generated under **Personal Settings → API Tokens**, not via a password-based approach.
4. **Re-authenticate** — update the token in the Bitbucket integration settings in Garth and re-link with a freshly generated token.