- Instant code reviews on active pull requests.
- Actionable inline suggestions on every diff.
- Smooth alignment with standard Azure enterprise workflows.
Step 1: Create the integration account
Register the account
Log out of your personal Azure DevOps account and create a new user specifically for this integration.
Finalize the profile
- Set the username to something identifiable, such as
GPRABot. - Use a team alias email rather than a personal address. - Enable Two-Step Verification (2FA) if required by your company policy.
When you rotate the service account later, update the token in Garth and
re-enable repository tracking — no other reconfiguration is needed.
Step 2: Create a Personal Access Token (PAT)
Authenticate as the service account
Ensure you are logged into Azure DevOps using the dedicated Garth service account.
Select token scopes
Grant exactly the following permissions:
| Scope | Access |
|---|---|
| Build | Read |
| Code | Read & Write |
| Identity | Read |
| Member Entitlement Management | Read |
| Pull Request Threads | Read & Write |
| Work Items | Read |
Step 3: Link to Garth
Open Garth integrations
Log into the Garth dashboard and navigate to Settings → Integrations.
Bind the token
Select the Azure DevOps tab. Enter your Azure DevOps URL
(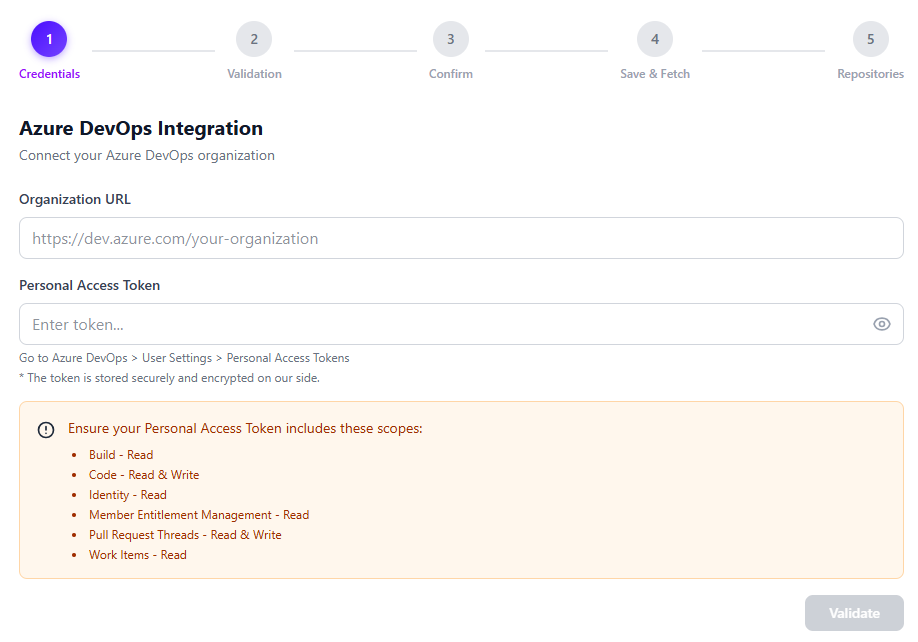
https://dev.azure.com/your-organization), Username (the service
account’s email), and Personal Access Token, then click Validate.Install repositories
After validation, select the repositories you want Garth to review and click Install Repositories.
Automatic webhooks: Garth installs webhooks on selected Azure DevOps projects automatically. No manual webhook configuration is required. Webhooks are also removed automatically when you uninstall a repository.
Step 4: Activate and configure the repository
After installation, activate each repository under Agent Setup → PR Review → Repository Setup. Once a repository is activated, you can configure the following options:- Files to Exclude — specify file patterns that Garth should skip during reviews.
- Source Branches to Exclude — exclude PRs originating from certain branches.
- Destination Branches to Exclude — exclude PRs targeting certain branches.
- Auto Review — enable or disable automatic reviews for new PRs on this repository.
- Repository PR Review Guidelines — define custom review guidelines specific to this repository.
Troubleshooting
Webhook issues
Webhook issues
If Garth is not accessing repositories or reviewing pull requests:
- Check webhook status — go to your Azure DevOps project settings under Service Hooks and verify the Garth webhook exists and is active.
- Manually delete the webhook if it exists but is not working.
- Refresh the repository page in the Garth app.
- Reinstall the webhook — untoggle and re-toggle the repository in the Garth dashboard.
Installation problems
Installation problems
If you cannot install Garth on a repository:
- Verify permission levels — the service account must hold Project Administrator or Project Collection Administrator permissions.
- Check token scopes — confirm the PAT includes Code: Read & Write and Work Items: Read capabilities.
- Re-validate the token — go to Settings → Integrations → Azure DevOps in Garth and re-enter your credentials.
- Toggle the repository — uninstall and reinstall the repository from the Garth app to force a fresh webhook setup.
Not receiving reviews
Not receiving reviews
If Garth is installed but you are not receiving any reviews on your pull requests:
- Check repository activation — go to Agent Setup → PR Review → Repository Setup and confirm the repository is activated.
- Verify Auto Review is enabled — ensure the Auto Review toggle is turned on for the repository.
- Check branch exclusions — confirm the source or destination branch of your PR is not listed under Source Branches to Exclude or Destination Branches to Exclude.
- Check file exclusions — verify that the files changed in your PR are not covered by patterns in Files to Exclude.
Authentication errors
Authentication errors
If you receive authentication or permission errors:
- Check token expiry — Azure DevOps PATs expire based on the timeframe you set; regenerate and update the token in Garth if it has lapsed.
- Confirm Entra ID is enabled — your organization must have Entra ID (formerly Azure Active Directory) active for the integration to function.
- Verify Microsoft App Consent — confirm your IT administrator has approved the Garth application in the Microsoft consent portal if administrative approval is required.
- Re-authenticate — update the PAT in Settings → Integrations → Azure DevOps within Garth and re-link with a freshly generated token.